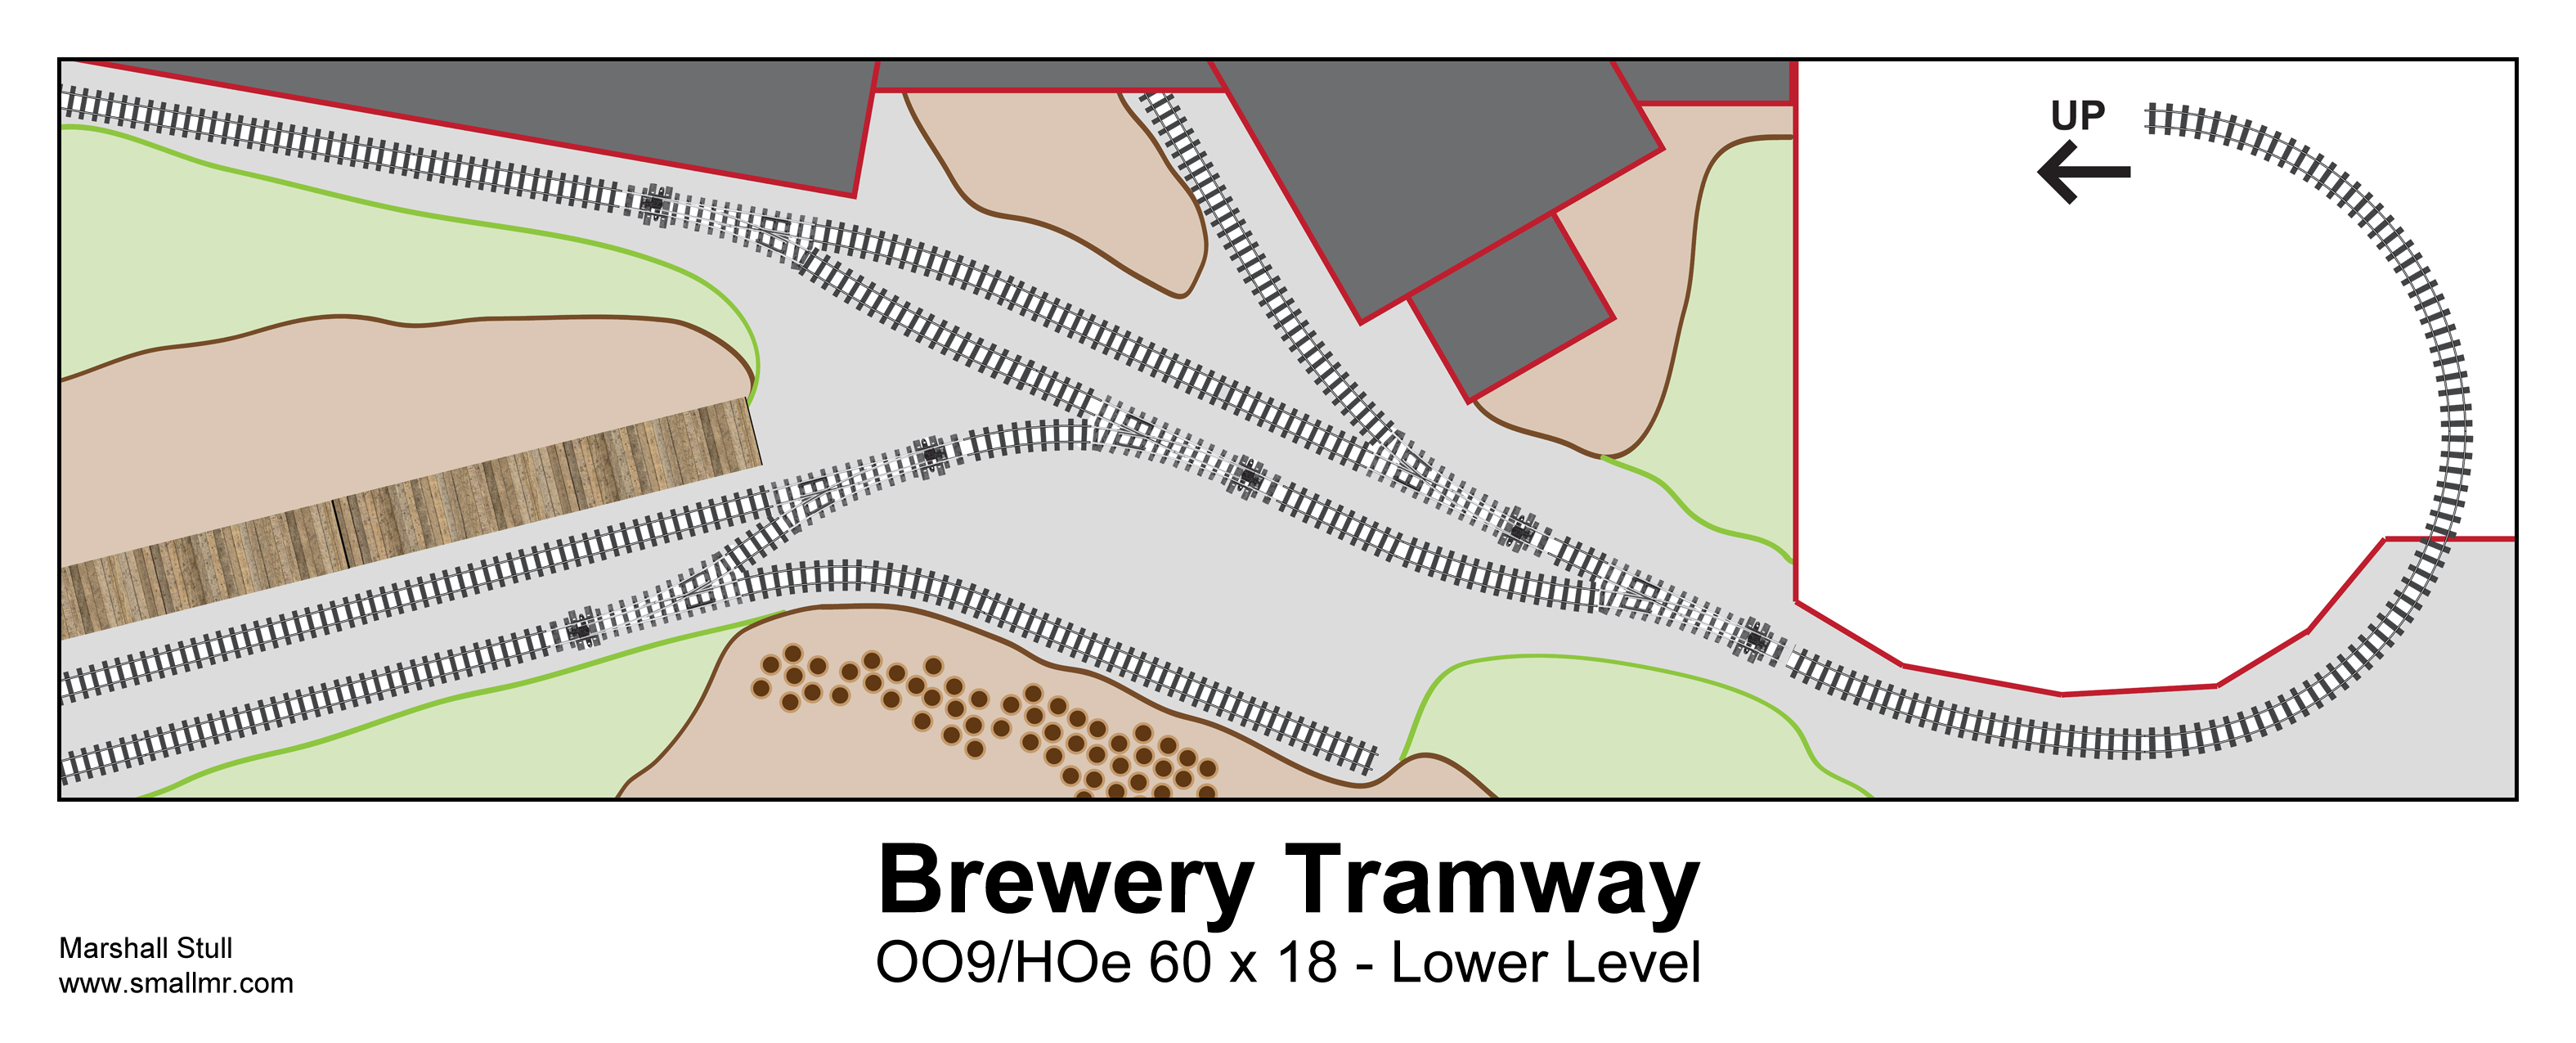
In a previous post we looked at the Brewery Tramway which included a prototype helix. The thought of creating a helix and multilevel layout continued to intrigue me for some time. I had never done one before, not even on my large layout attempts. I decided to try and build the helix and if all went well possibly the entire tramway layout.


I decided as a construction material I would try foam board. This material is very light but can warp easily if the construction methods do not prevent it.
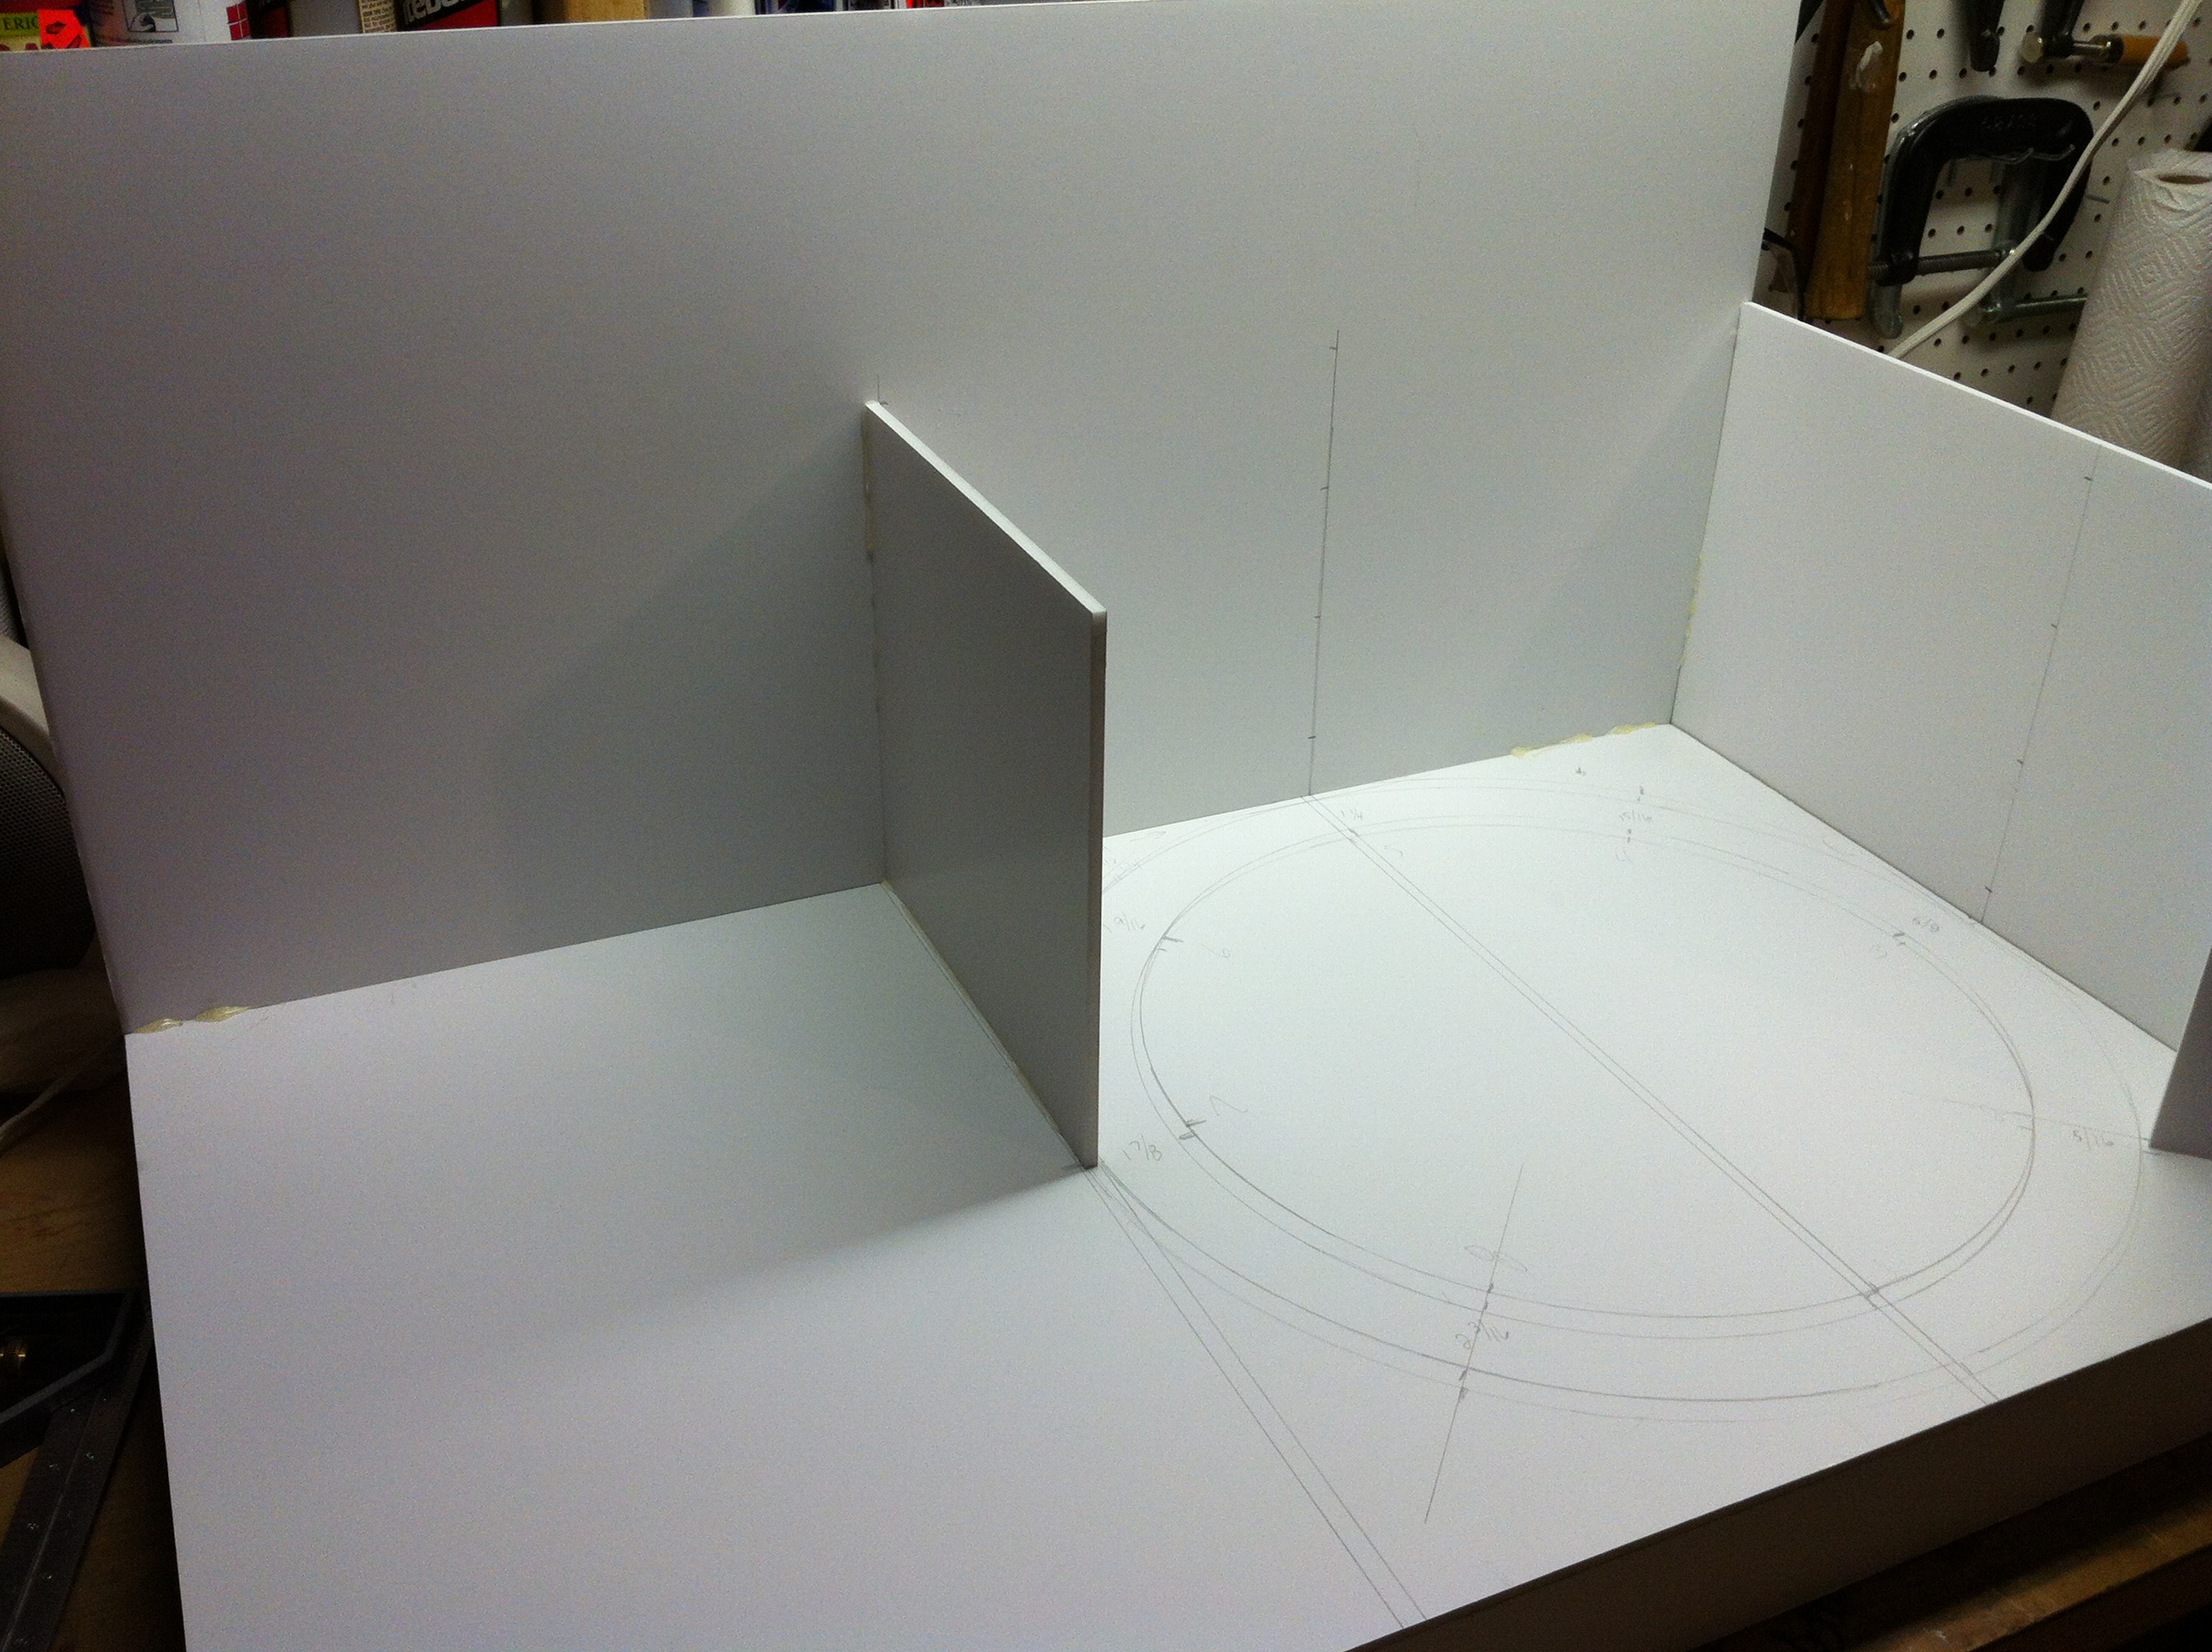
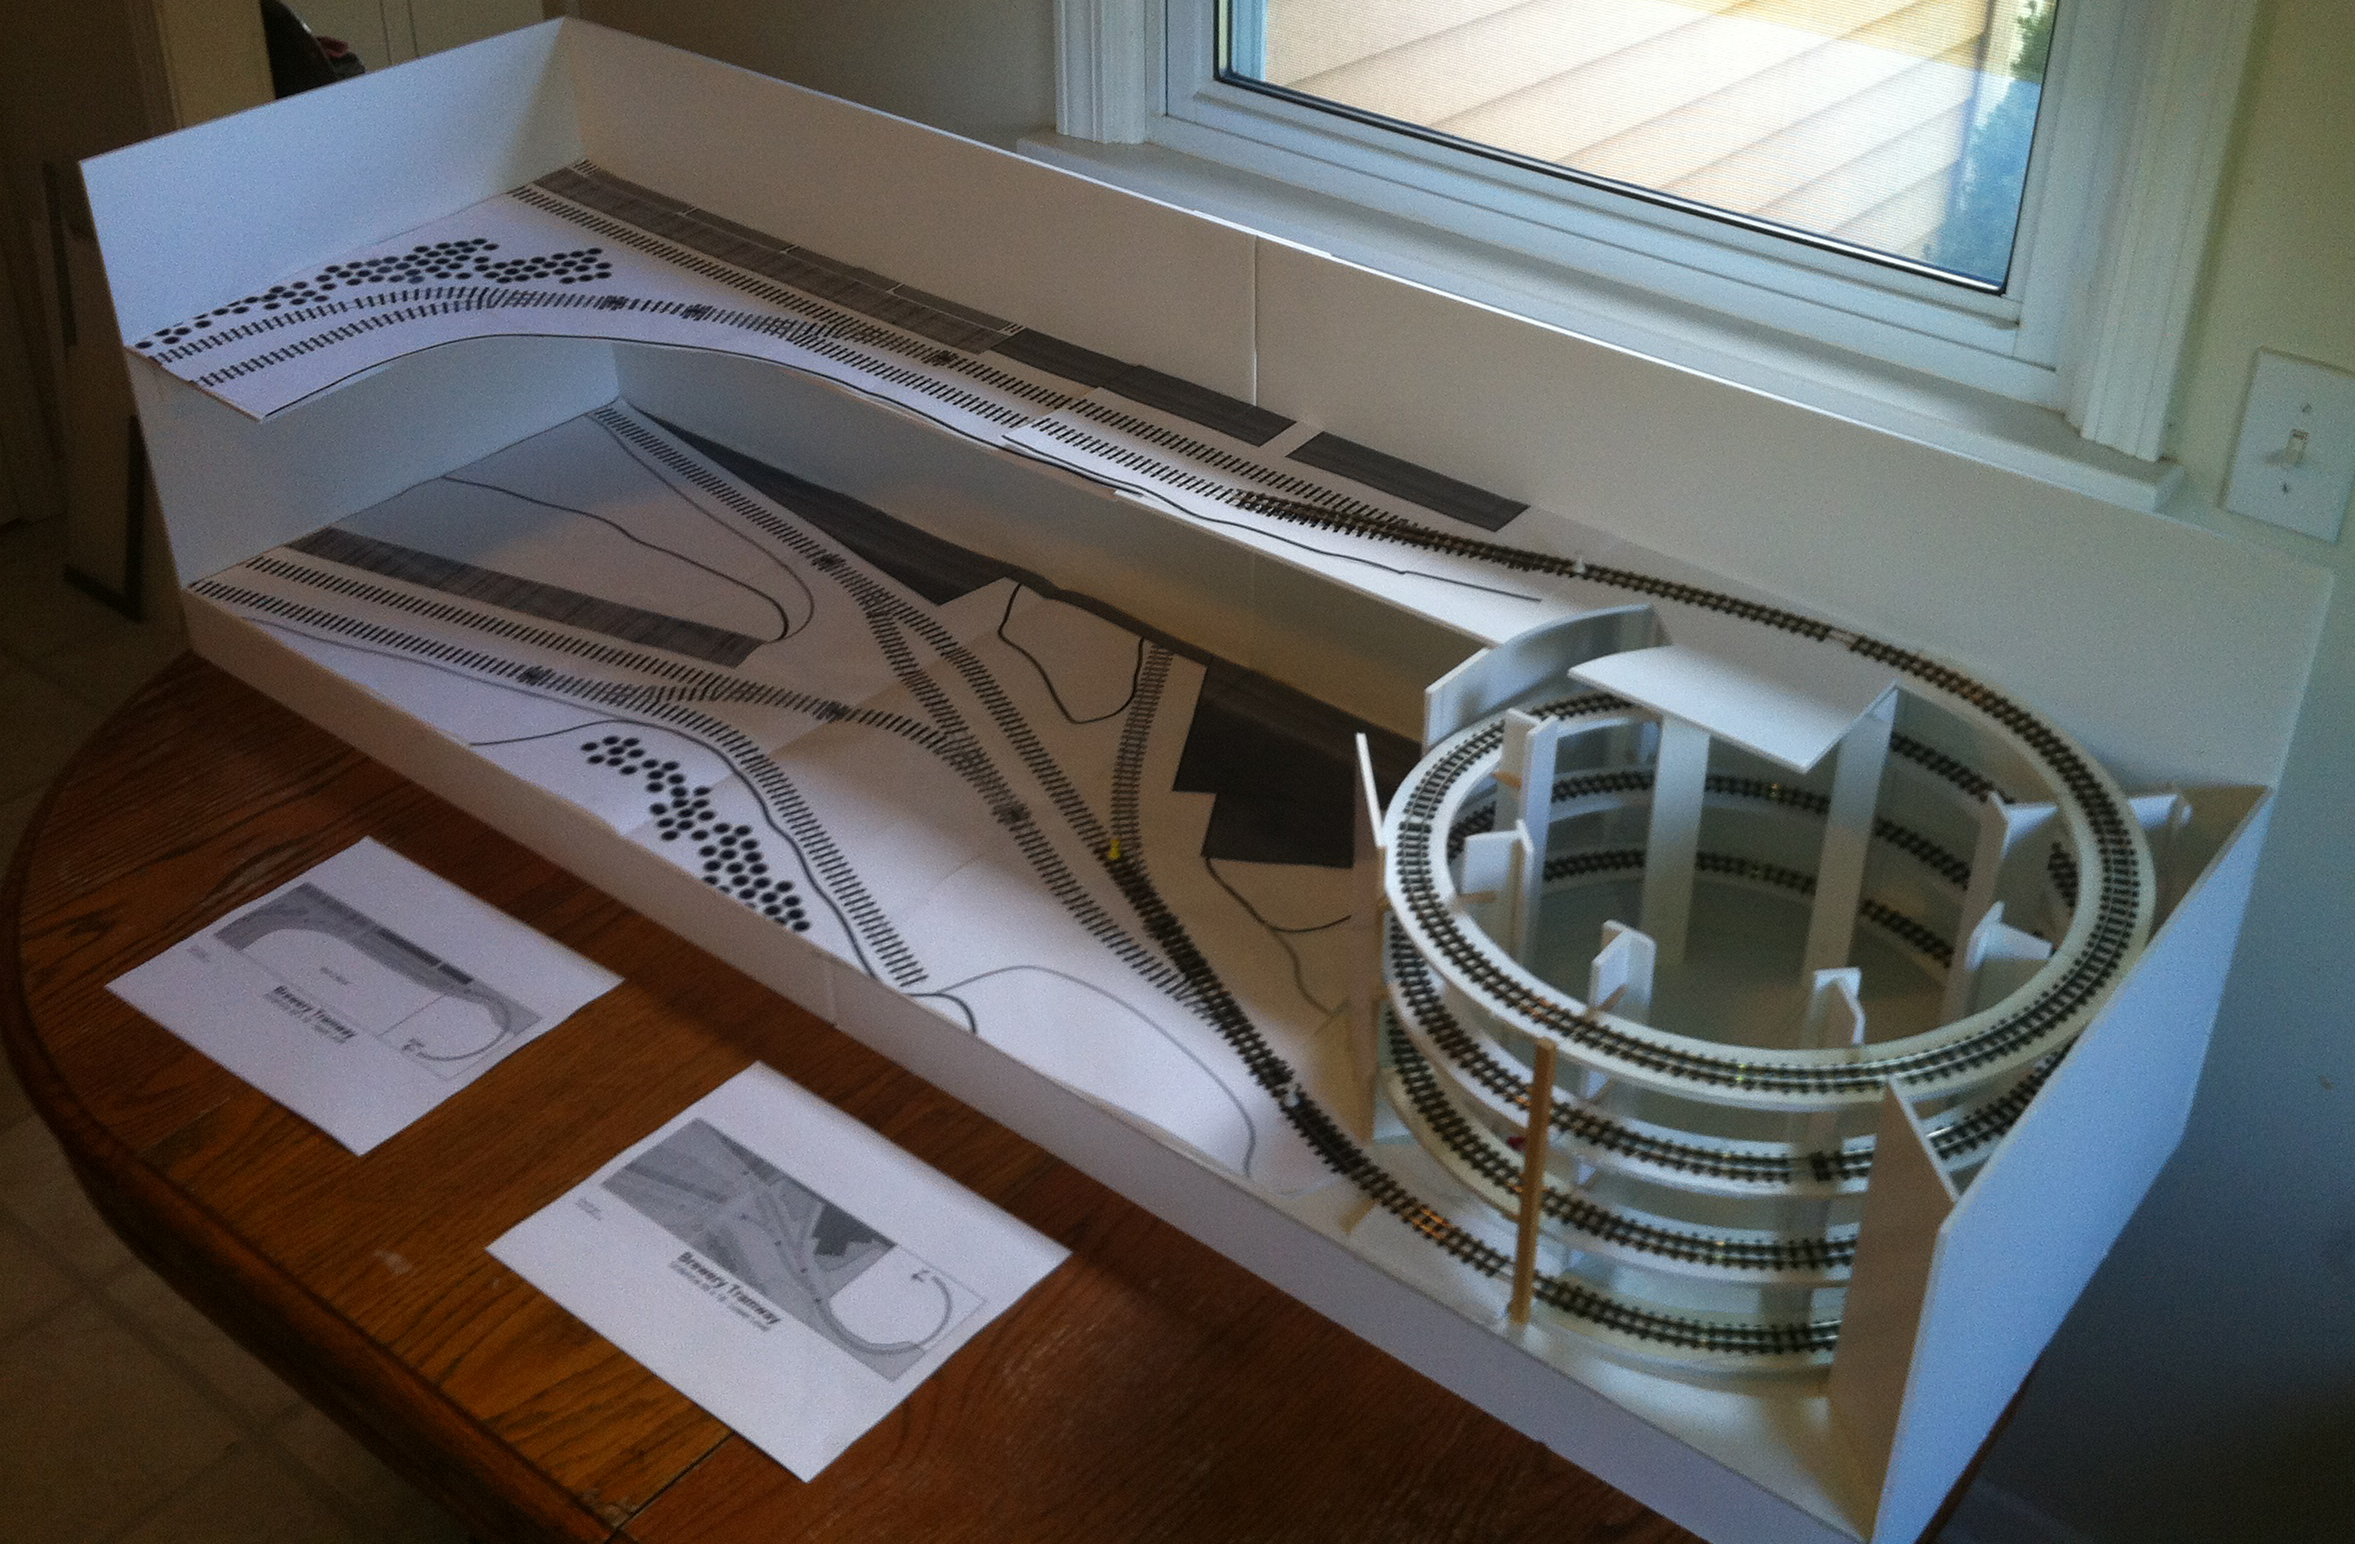
I created a base from sheets of foam board cut to 17.5″ x 29.5″. The base is approximately 3 inches high with a single sheet of foam board on top. Underneath I added several cross members to stiffen the top. I used hot glue on all mating surfaces and joints. Working with hot glue requires a lot of test fitting prior to actually assembly. You must work fast as the glue thickens as it cools. I then added the a sheet for the back and a sheet to one side. This forms the right end of the completed layout. On this base I drew the full size dimensions of the helix and added a side wall to enclose the helix area. NOTE: When using hot glue, it is a good idea to go back over all joints with a bead of hot glue. This proides extra holding power and fills any gaps.
I designed the helix with 8 vertical struts. Each struct is also made of foam core. I assembled the struts by gluing 2 pieces of foam core in a “T” along the vertical of each strut. Since the helix will have 3.5 turns and each turn will rise approximately 2.5″ the total height of the helix will be 8.75″. I made all struts this height.
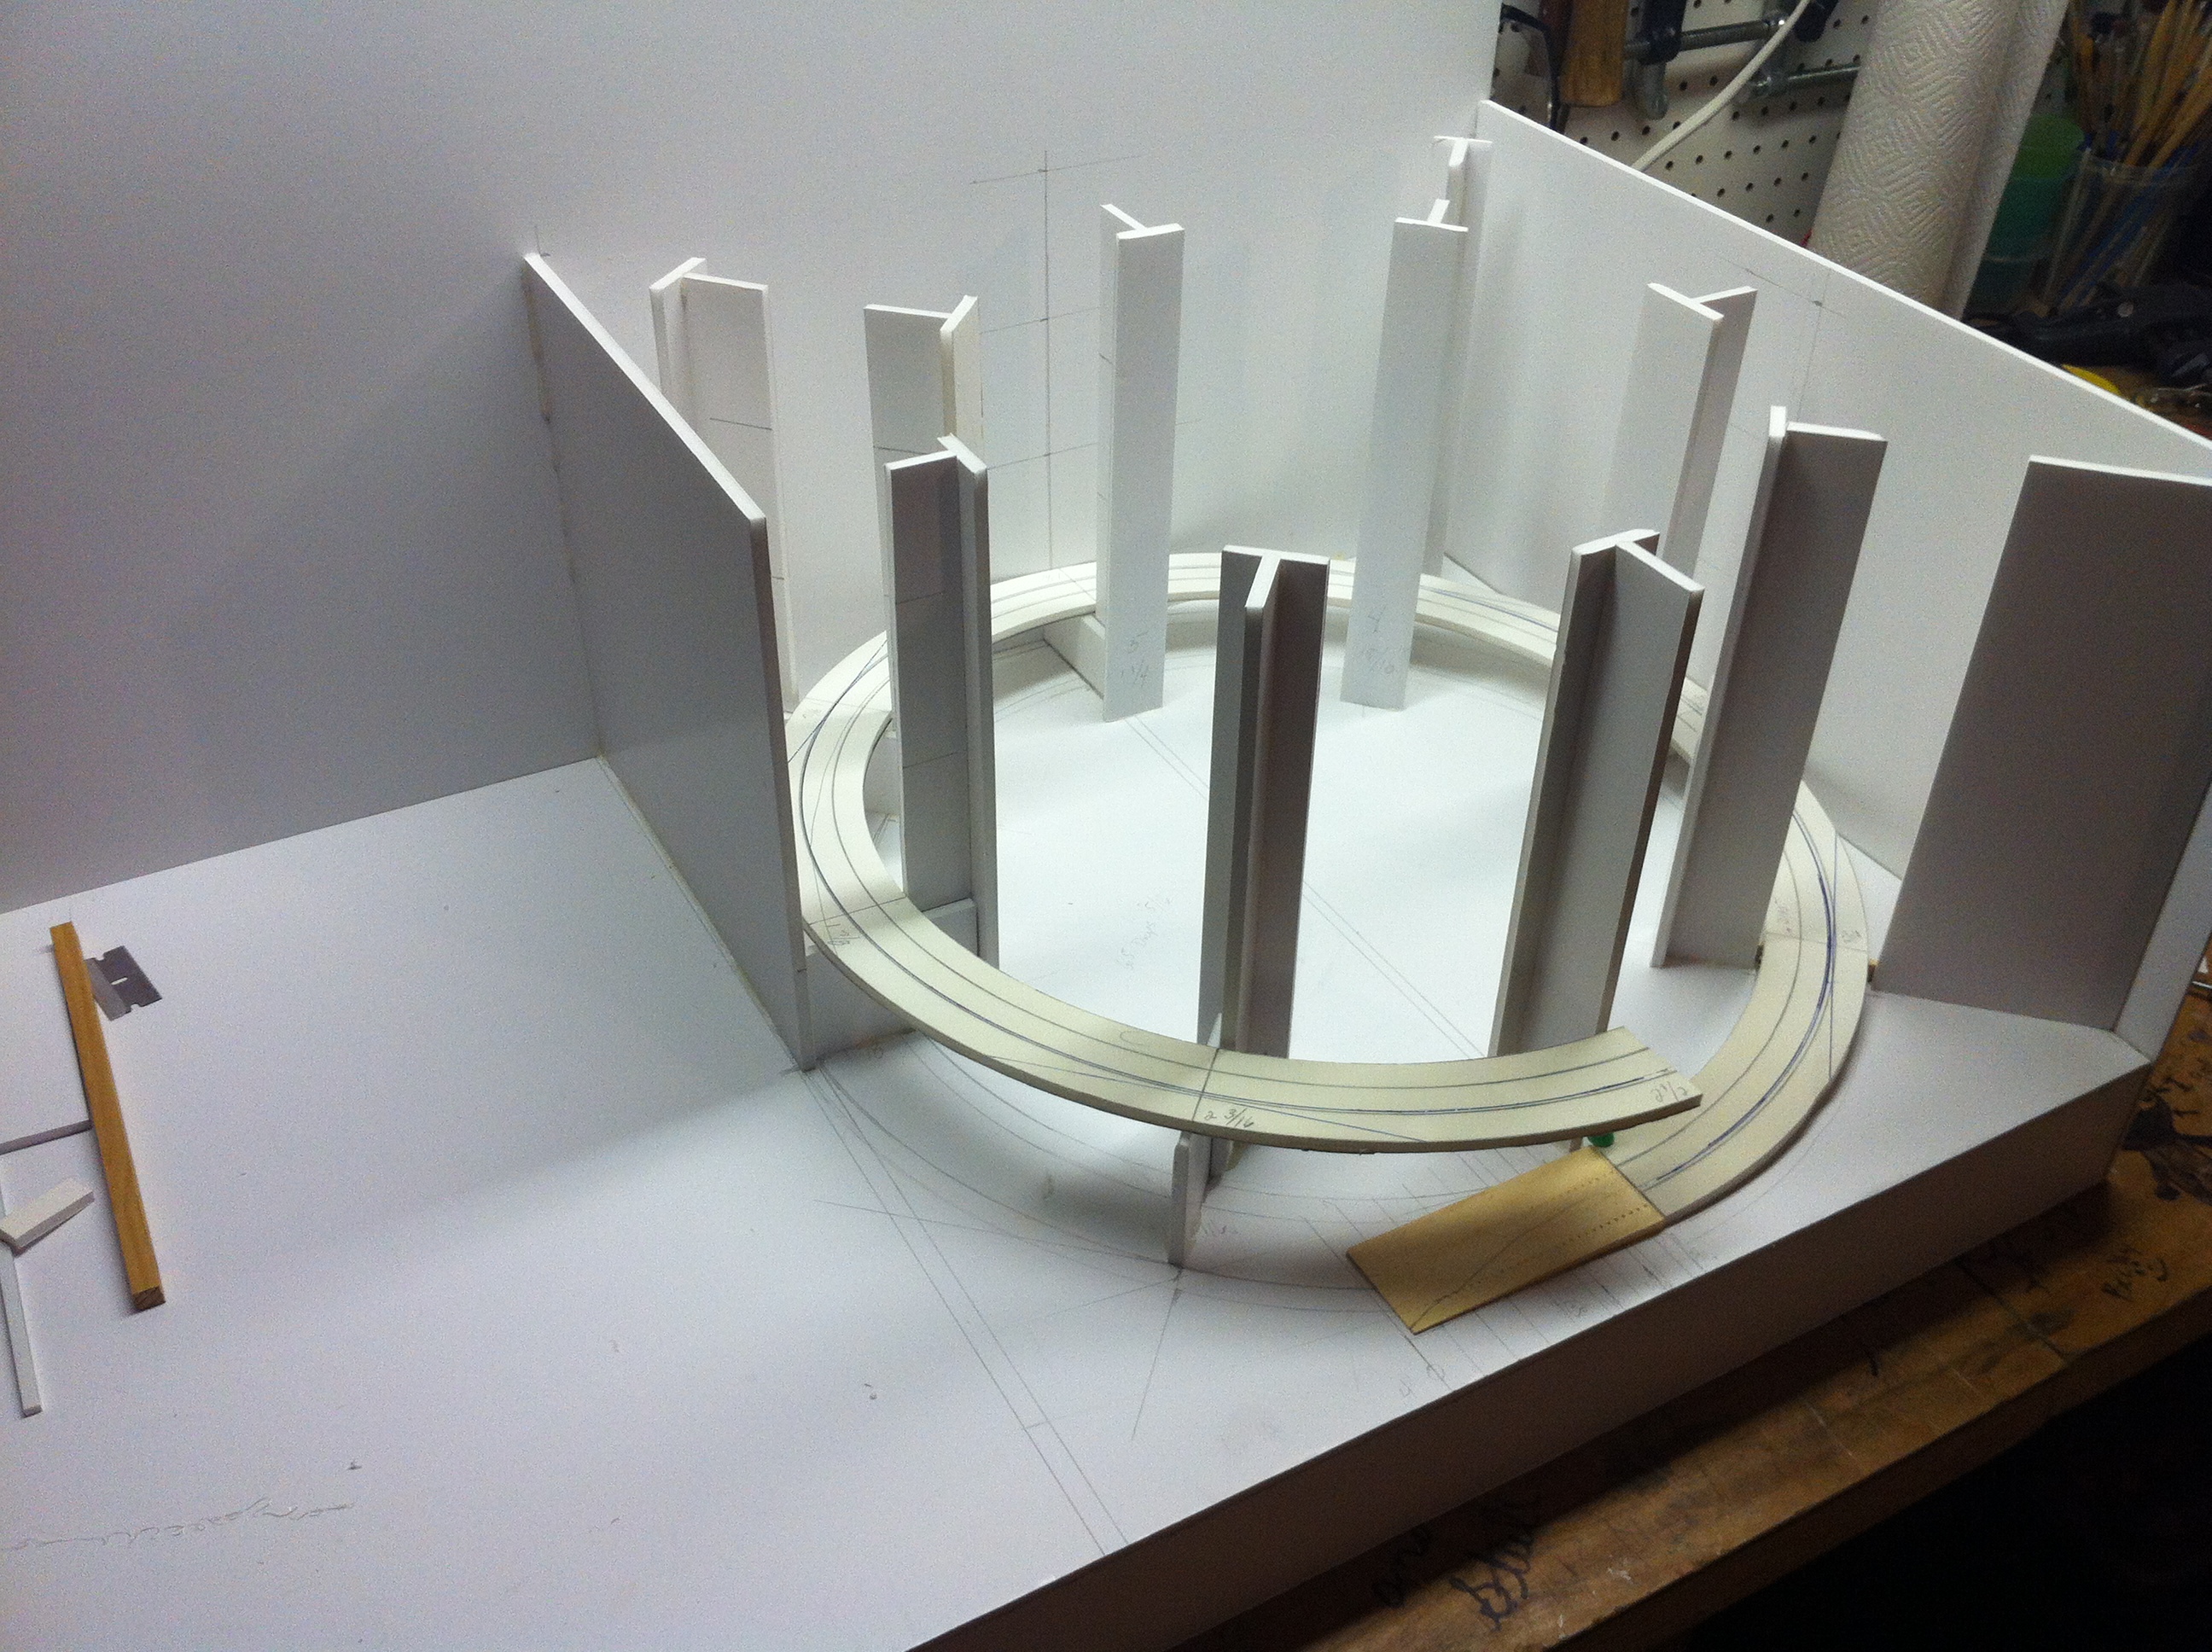
To create the roadbed for the helix, I cut out four foam circles (one for each loop in the helix) then cut the middles to make doughnuts out of them. To assist with the placement of the struts, I used one of the doughnuts and planned the placement of each strut. Paired struts were required where no supporting wall was available.
Then I cut a slit in each so I could attach it to the next part of the helix. Once that was done, I started laying the track on each doughnut before splicing them together. I used construction adhesive to glue the flex track down. The track would overhang the end of the doughnut where the joint would be. I would add the next doughnut section and hot glue a short piece of foam board underneath to secure the joint. With the joint in place I would continue to lay the track to the next joint. The flex track with construction adhesive served as a kind of top plate as well. In this way, I was able to build the loops of the helix and lay the track at the same time. It was nice to not have to work around the supports for the helix as I laid the track.

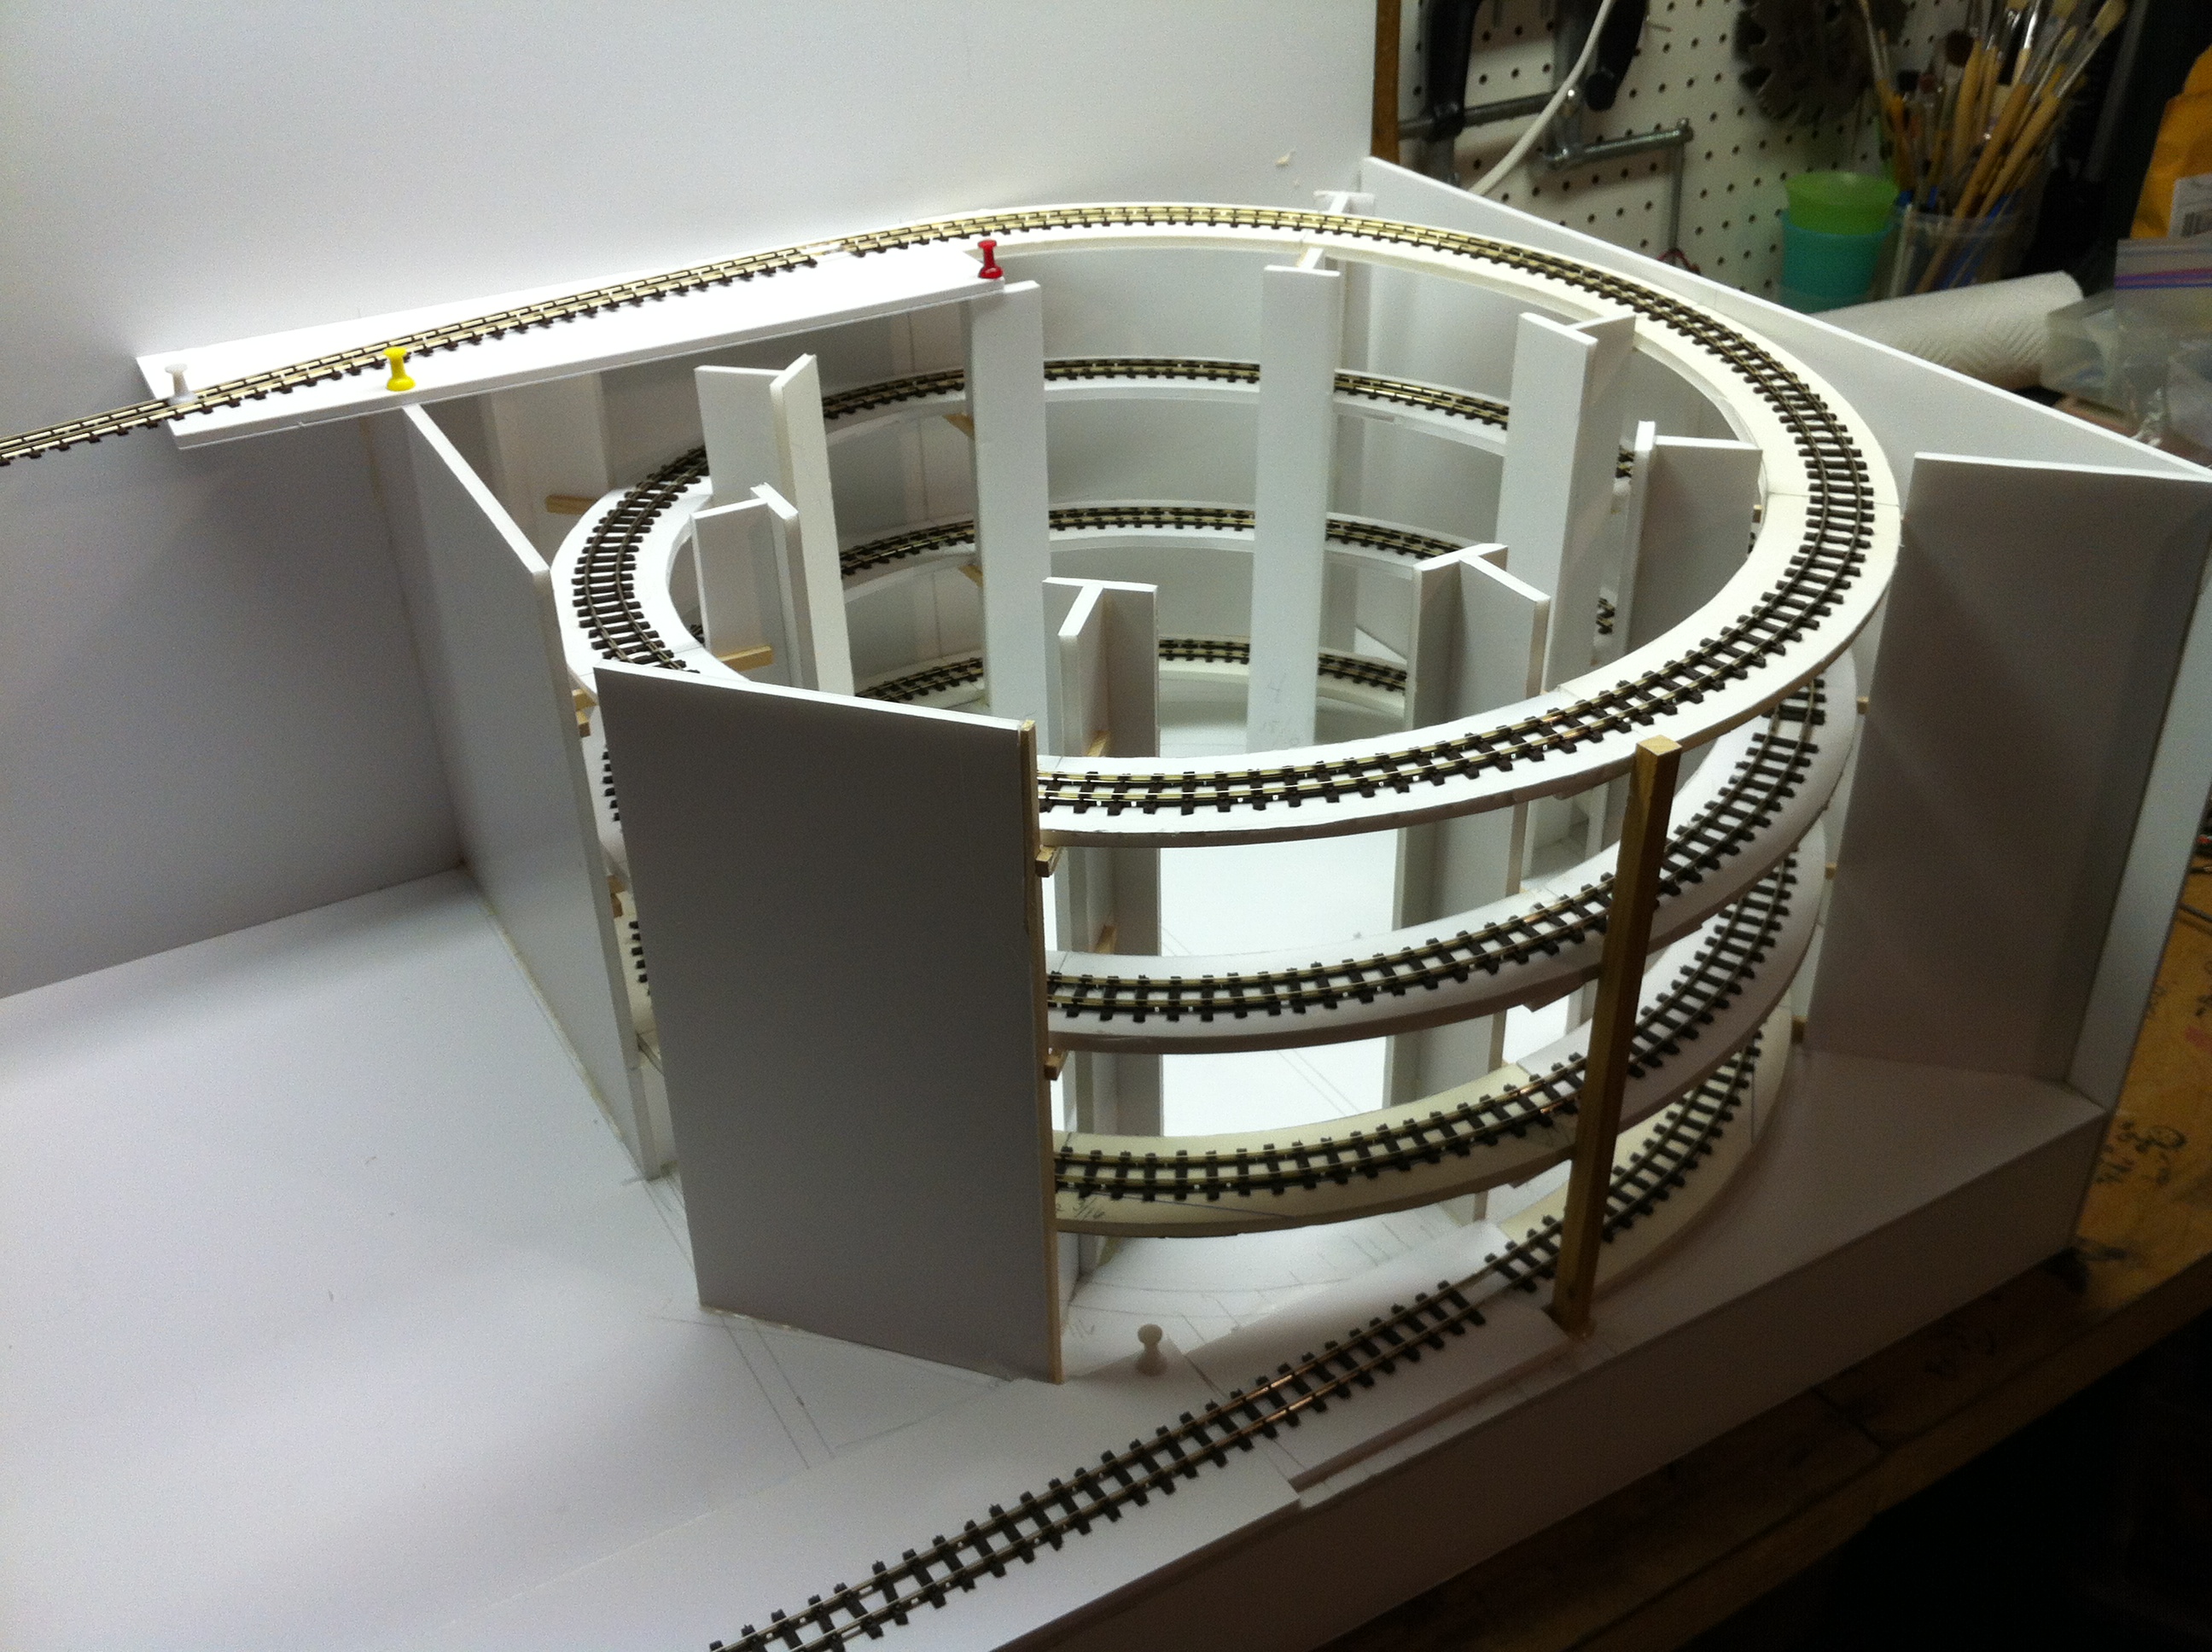
When the track was done the whole thing looked like a giant slinky. I then laid the assembly into the jig (the white columns that surround the helix) and added spacers under the first course of the helix. This is where things were critical. The lift had to be even at each of the 8 points of the vertical columns. I made shims from foam core and lifted the first course. Once the first course was perfect, I glued them all in place. All the later courses were spaced out with a jig so they went very quickly. I used basswood cross beams at each column. I made sure to glue the helix down in each of these locations securely with CA.

There was some tendency to want to twist but it was very minimal with the process I used and gluing everything to the basswood cross beams corrected it. I can pick up the layout by the helix. It is quite sturdy.
Also a major factor is the track which is Peco OO9 flex track. The stuff is very high quality, bends very easily and is robust. I like it much better than anything else I have tried (even in HO and N).
I have tested the helix with an N-scale Bachmann Plymouth pulling three N-scale cars. The little diesels did fine on the 5% grade. This will be acceptable to mimic the typical short trains that the prototype brewery ran. I have been so pleased with the building of the helix, that I have built the left half of the layout base and have started on the upper level shelf.
More to come…
I really like this idea! I’ve been kicking around the idea of building a tiny HOn30 layout using converted N scale steamers and diesels and had been wondering about a small helix like this. Well, my questions have been answered! And the foam core is just a great added bonus. 😉
Great info, thanks for sharing.
Patrick
maybe i missed it somewhere but what is the diameter of the helix? great idea and great plan
The helix is about 7.5 inch radius. The full track plan is at http://smallmr.com/wordpress/brewery-tramway/.
glad you like it!
Marshall
did you do anymore to this layout? Did you make the Guinness engine?
Sorry to say, the layout is still unfinished. Scratch building the Guinness engines are a bit beyond my capability at this time. I have planned to revise the layout to O9 instead of OO9. I have purchased equipment and cars but have not done anything else yet. The scenery has me perplexed at this time. I will not try to model Guinness exactly but I still wish to use the theme of a brewery (or winery) with upper and lower levels.
This layout and my Mound City Layout will sit idle until I complete the Free-mo build I have in progress.
I’ve 3d printed the tram, but it seems very small at 009 (I was going to use n scale track and HO bodies as 009 isn’t available here.) I’m doubtfull I can get a nscale power unit at the correct size.
Roop, For short wheelbase power units have a look at ebay for Kato 11-103 and 11-104 and TomitecTM-TR02 tram chassis. one of these should fit your tram body.
This fantastic. I thought about making my helix out of polystyrene but was a little unsure about how to go about it. I’m glad you had posted this on the Web. Everyone else seems to use 3ply, it’s nice to see someone else can think outside the square. Thanks.
Using 3 ply depends on the material used and its “flexing” quality. I suggest you test with the most weight you expect to have on the helix. This will help determine the support spans.
Fantastic idea. I’ve been toying with the helix concept for some time and two tier exhibition layouts are rare in the uk. I’ve started using foam board construction on my large ho railroad and found it very adaptable. Thank you for sharing the concept and one which I’m about to start.
Please share your layout as you progress. Always great to hear how something here inspired others!!
I’ve started my beams and platform to your size. I have flex track of no known origin but I’ll use it anyway. I have never bent flex track and wondered what you used for a pattern or did you just bend and glue along the way?
I marked the center line of the curves and placed the track centered on that curve. I bent it as I went and used LOCTITE PowerGrab to glue the track in place. I used push pins to hold the track as I went. The glue will hold its own after 10-15 minutes. I used PECO flex track which bends very easily. Anything else may have to be pre-bent.
Please share images of your progress!!
Interesting. I found your previous post on the Guinness Brewery and am designing a 3×4 foot 7/8ths Scale 45mm gauge layout but I never saw this plan till now, thanks!
Foamcore is a very useful material as long as you use its strengths and BRACE its weeknesses!
I have started building a new N gauge 2 level layout with 2 helixes. I am constructing the helixes from a special kind of foamcore board called “Gatorfoam”, or “Gatorboard” it has a much more dense and stiff foam core and is laminated with a resin and wood fiber skin on both sides. It is made for the sign industry for outdoor use and is nearly warp proof and waterproof (very important for MRR use!) and does not dent, bend or crack with finger pressure. It comes in a number of thicknesses from 3/16″ to 2″ and sheets up to 4’x8′. It is more expensive than the soft, easily dented and damaged paper or thin plastic film covered common foam board, but is comparable to high quality 5 or more ply 6mm birch or poplar plywood and has as much or more structural strength.
If you can afford Gatorboard it is without a doubt the superior product! If I was to do this again, I would use it! My technique will have a limited lifetime given the nature of plain foam board. But after all I did this as a learning experience and it showed what can be dome in small spaces.
Marshall, I really appreciated your effort in “pioneering” This method! It opened my eyes to thinking and researching alternative materials to the typical plywood construction. A sufficient quantity and quality of plywood today at post covid prices, was actually more expensive than the gatorfoam board from the source I found, the way I’ve engineered my version, and will take up less clearance overhead, a problem I found when building for N gauge. I just received my shipment of board and will document the build. The 2 helix constructions were a real stumbling block holding up the rest of the layout.
Hi Charles! I recently started with a temporary layout on some scrap MDF, but I’m interested in seeing your technique with Gatorboard for reference when I upgrade it. Do you have a site or blog where you are documenting your build?
I have received my gatorfoam board but have not yet started building my 2 n scale helix: 19″ track radius; 5 1/2 turns on one, 2 1/2 turns on the other; so no documentation yet. I have laid it out into my layout plan in xtrackcad and the cutting plan layout in corel draw!Here’s a preview of my technique: using 3/16″ gatorfoam, cutting 1/4 circle segments, 8 per full circle. Will laminate 2 segments with the ends offset 4″ to form 4 segments with matching interlocking tabs. 4 of the laminated segments will be connected by laminating the opposite matching tabs to first form a revolution, track applied, then tabs connected to the next turn above and the track continued until the helix is completed, towers will be used to support and space the layers. The beauty is that the helix is 3/8″ thick without any doublers decreasing overhead clearance and all parts are identical so assembly jigs are easy.
This is for an N scale layout? Sounds interesting! I got my layout back out again after a couple year hiatus and ran some new HOn30/OO9 equipment I had purchased. I found hauling several cars up the helix possible. I only wanted to pull 3-4 at a time so it is very satisfactory!
yes, n scale. now I’m waiting on more peco flex track, 25 packs of wood tie are virtually sold out everywhere I’ve checked.
I’m seriously considering making something similar to this for my own, I would move the helix off the main area and have it like an addon so that a main yard could fill that spot. I want to make a shortline that serves a juice plant and a couple other industries. I have n scale Dash 9’s that I’d use for the power cause at the most I’d have 10 cars and move up north to an interchange on the second level, with the possibility to expand to a further out shelf. Thanks for sharing this awesome idea!
Hi Marshall – You helix is an engineering marvel. It’s great to see this works on 5% grades and 7.5″ curves! Do you think there is a benefit of doing a helix over perhaps making a curved cassette that could be moved from the bottom to the top and vice versa? (Other than not having the chance to drop any stock and not having to tough anything to get from one level to the other! Really like the two tier arrangement in minimal space.
A movable cassette is also a great choice. I think handling the trains will have it own issues. I have also seen vertical traversers which could be a solution as well. In this case I was trying to mimic the underground spiral the brewery used. I actually would do it different now, I think there are too many loops and the height difference was too much.
Many thanks for the reply. Much appreciated. Its great you’ve proved the Helix and shown the Brewery spiral works in model form. All the best.
Actually I must apologize for not responding sooner, I have been very busy with many endeavors so the website has suffered. Just happy others still find joy in it.