It never fails on the Free-mo Yahoo Group. Once, every couple of months, someone asks about best way to construct a module. Most times when the question is asked it either starts with or converts to a debate on Foam vs Plywood. I use both materials and feel that proper use and techniques are key to success.
Since becoming active in Free-mo, I have built a few modules. Each time I built one, I tried different construction techniques. Some worked and some did not. Some failures were because of me and some because the materials chosen was not correct. Most times it was the wrong technique for the given material. it is important to realize that the material was not at fault, how it was used, was at fault.
I have certain objectives when it comes to my modules. I think it is important to list them and keep them in mind when building a module or layout. I do not insist on these for others but I set them for me. Here is my list of objectives for a finished module.
All Inclusive
All inclusive means that everything is there, attached to the module when I arrive at a venue. I want simple setup. I do not want to try to figure out what leg goes where or forget something at home (like a leg). One example to achieve this is how I design all my modules with integral folding legs. it requires more during the build but pays big dividends when you arrive at a venue and your module is up and ready in 30 seconds. i cannot tell you how many times I have spent hours assisting attaching legs on other people’s modules.
Light Weight
When I started free-mo, I had no one readily available to call on for help. I will have to pickup and move these myself on a regular basis. This design advocates lightweight materials used in ways to create a stiff structure. Heavy materials are only used where necessary and then I use techniques to lighten those materials without disrupting its strength.
Easy to transport
I will admit, I have always owned a minivan, SUV or a truck. That has allowed me some advantage over others. Even so, I still take into account how to best fit the modules in the vehicle, how to store them and can I negotiate all doors, turns, hallways when I do need to transport my modules. The latter has been a big issue in a few instances.
Strong
These modules will be transported long distances and be exposed to extreme temperature and humidity changes. Quality construction materials should be used with attention to quality of joints, glues, screws and nails. Just because you use quality materials does not equate to quality work if poor construction methods are used.
Easy Setup
I want to run trains, not waste time setting up modules. My design allows for the quickest setup. Integral legs are 75% of the battle.
Economy
I am frugal! the design presented here tries to maximize the yield on sheets of plywood. I also do not see the need to purchase something I can make myself for less money. I shop around for equivalent materials which meet my standards. i will buy the whole sheet of 4×8 plywood if I think I will use the whole sheet in the next six months. I take the time to calculate yield on full sheets so I know exactly how much to by and how to cut it. I get the lumber yard to make the big cuts in the correct places and make the sheets easier to handle.
Details of the Design
My latest design was drawn in the free version of SketchUp. A copy of the file can be downloaded from HERE. The following are images are from that file.

This design will upset traditionalists who insist on building modules so strong as to support the weight of a person. Building a module to do so just hurts your back when you have to move it.
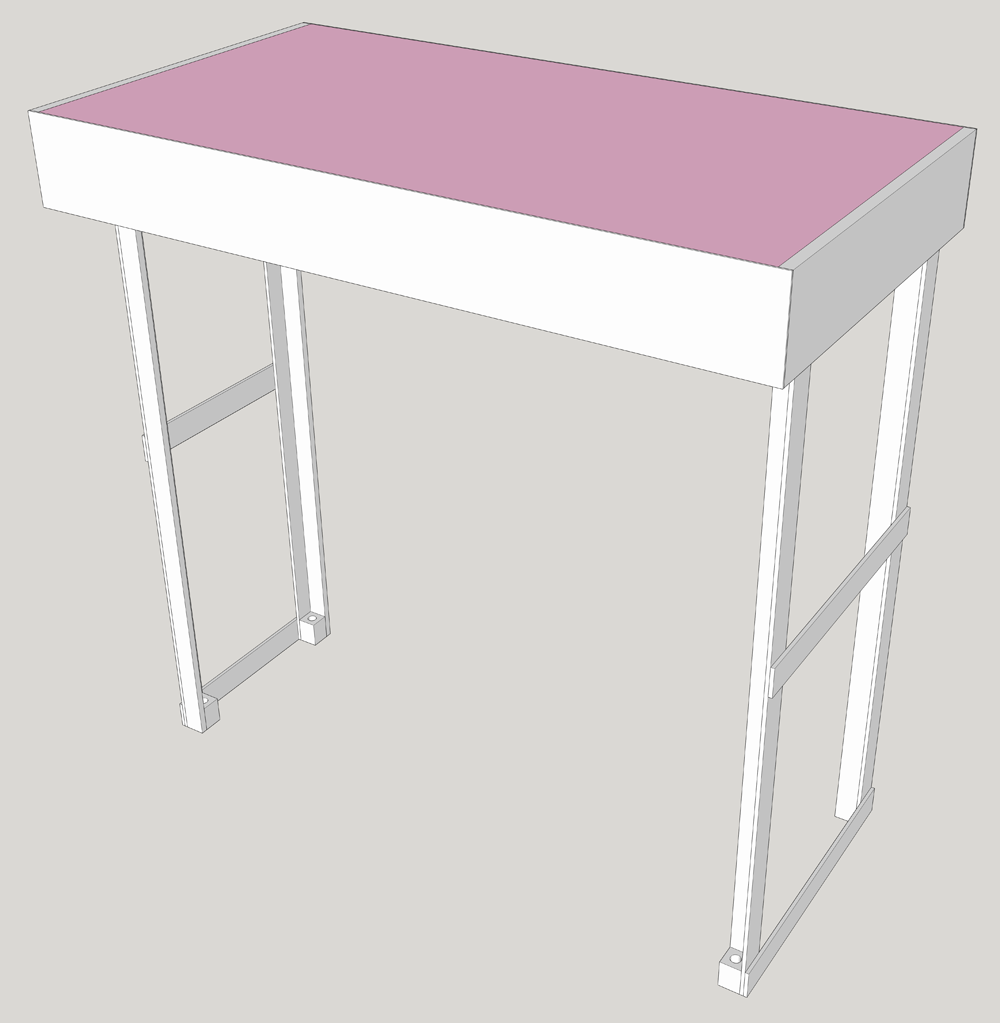
The overall module length is 49.5 inches. That may seem like an unusual dimension but this is done to save materials and add room for the folding legs. A standard sheet of plywood comes in a width of 48 inches and in Free-mo the end plates must be 3/4 inch birch plywood. Two end plates equals a total of 1.5 inches plus the width of the plywood sheet gives you 49.5 inches. So you have less cutting to do and you take advantage of the standard width of the plywood sheet.
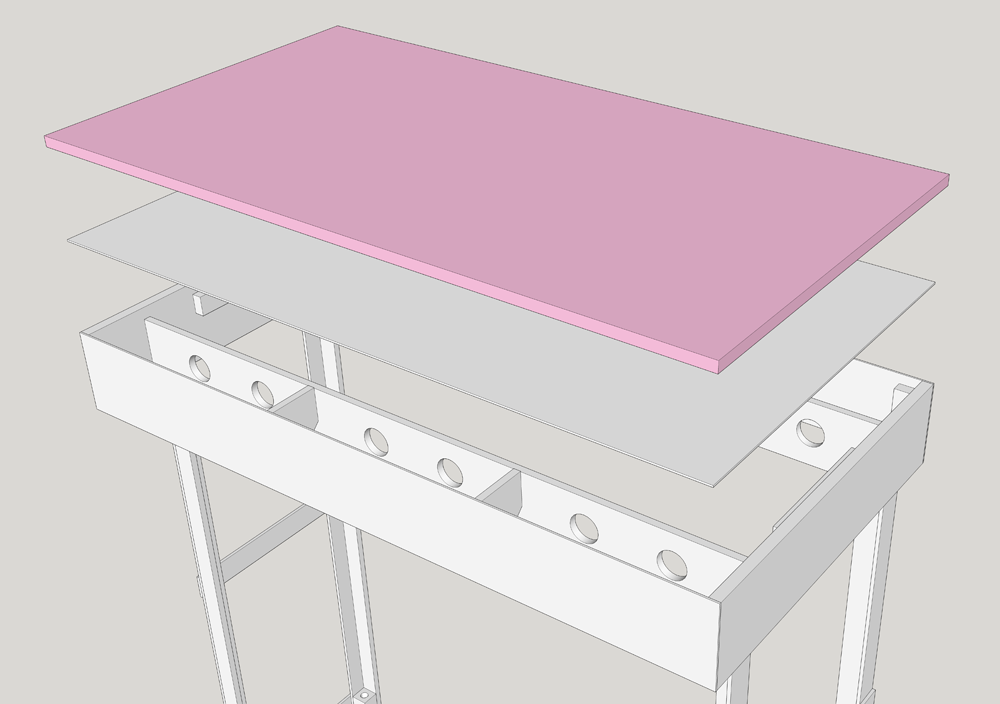
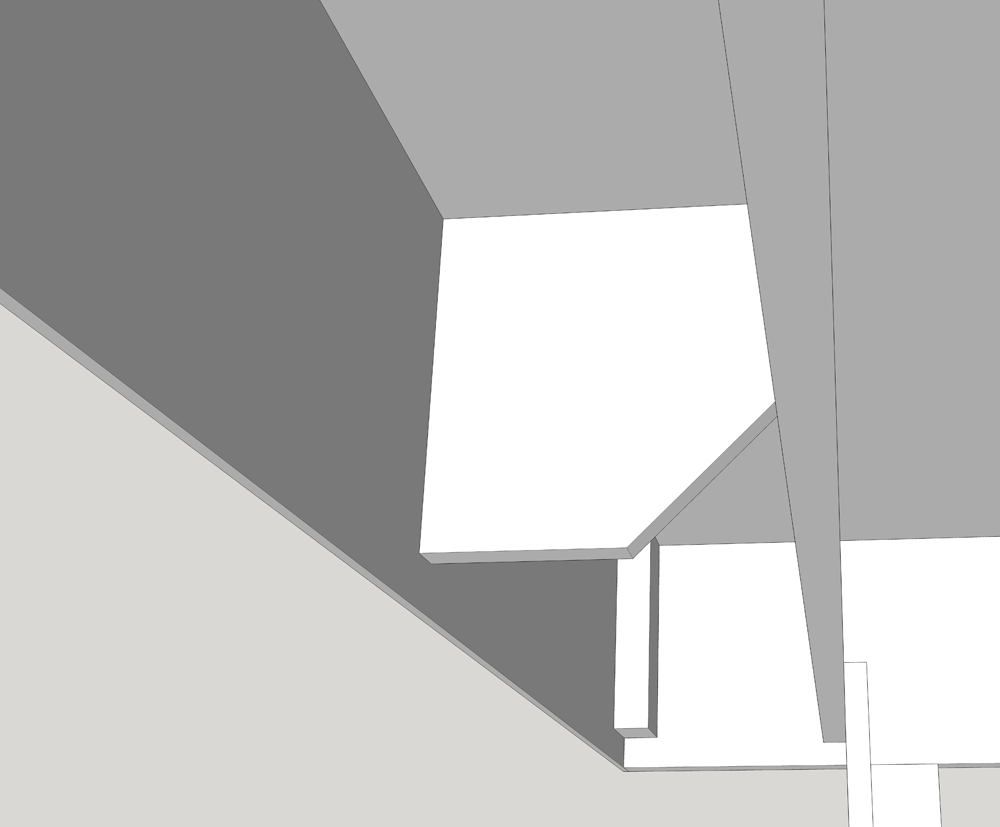
As can be seen in the images, the design has a foam top (a no no to some). What you may not have noticed is that it is what I refer to as a sandwich top. It has foam bonded to a plywood bottom. This provides the best of both worlds. This design will only work if the correct adhesives are used and adequate drying time is observed. Once set, the resulting sandwich is strong and rigid.

You will also notice the large open area on the underside (down the middle) of the module. The width is 16 inches and with the sandwich, defection is not a problem. To make sure the sandwich and the end plates remain at the exact same height, cleats have been added at each end.
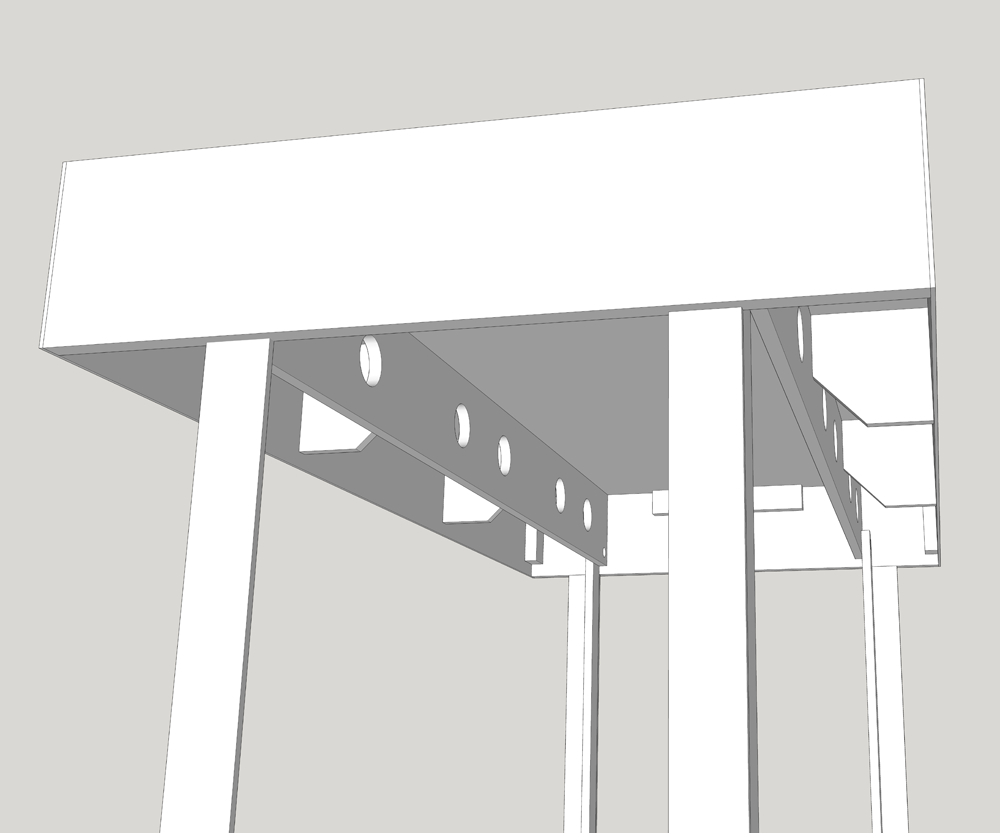
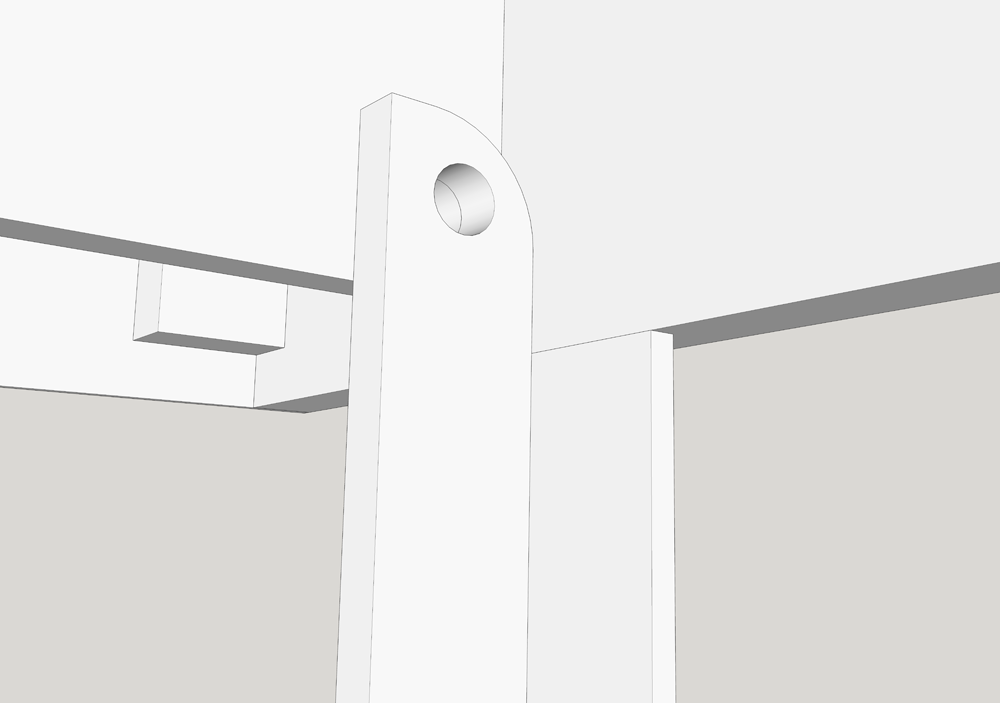
The sides are 1/4 inch plywood while the stringers are 1/2 inch birch plywood. The stringers have large holes to lower weight and to provide channels for wiring. Ribs have been added every 16 inches to provide extra strength to the sides. Notice that the ribs have a corner removed. This is to allow space for the legs when folded into the frame. The height of the stringers and the ribs are dependent on the depth of the sandwich, the stringers should be at least 1/2 inch inside the height of the outer frame.
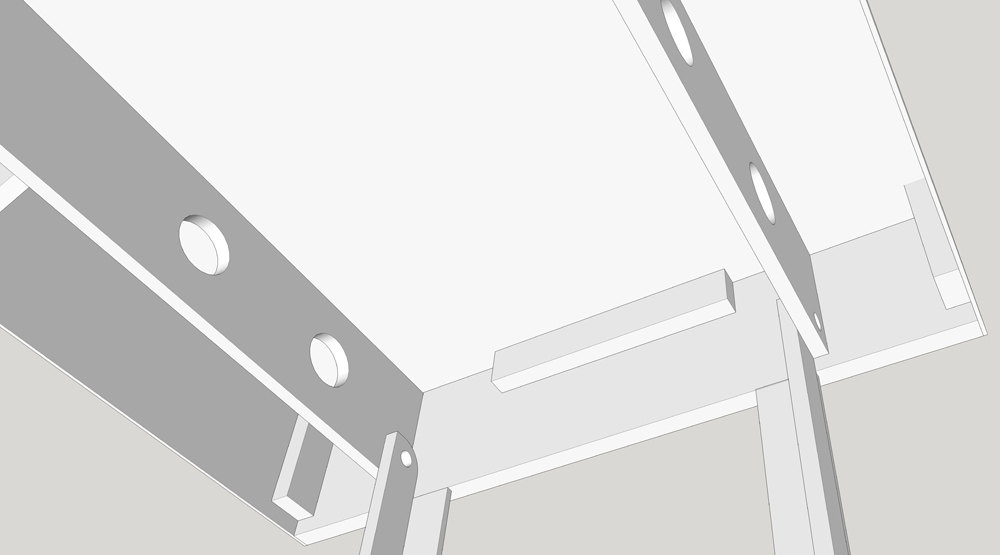
The legs are designed to be bolted to the stringers which act as hinges. You will notice that one set of legs bolts inside the frame while the other bolts outside the frame. In this way one folds in and the second set will lay over the inside set holding them in place. The legs are created by using one piece of 1/2 inch plywood and a piece of 1/4 inch plywood. A 2×2 block is added at the foot to accept a carriage bolt for adjustment. When extended the legs have a built-in stop that meets the end plate.
Transport
As I stated above, how modules get transported is a big deal. I usually will design a rack to haul a module set. These can be vertical or horizontal depending on the type of module. heavy scenery and I will haul the flat and stacked. Yard design (minimal scenery) will be placed on edge. The design includes the use of casters on the bottom. I never want to carry a module set more than a few feet. With a cart, I can park far and still move in with ease. HINT: Always get the largest casters you can afford/fit. The larger ones will roll better over uneven ground.
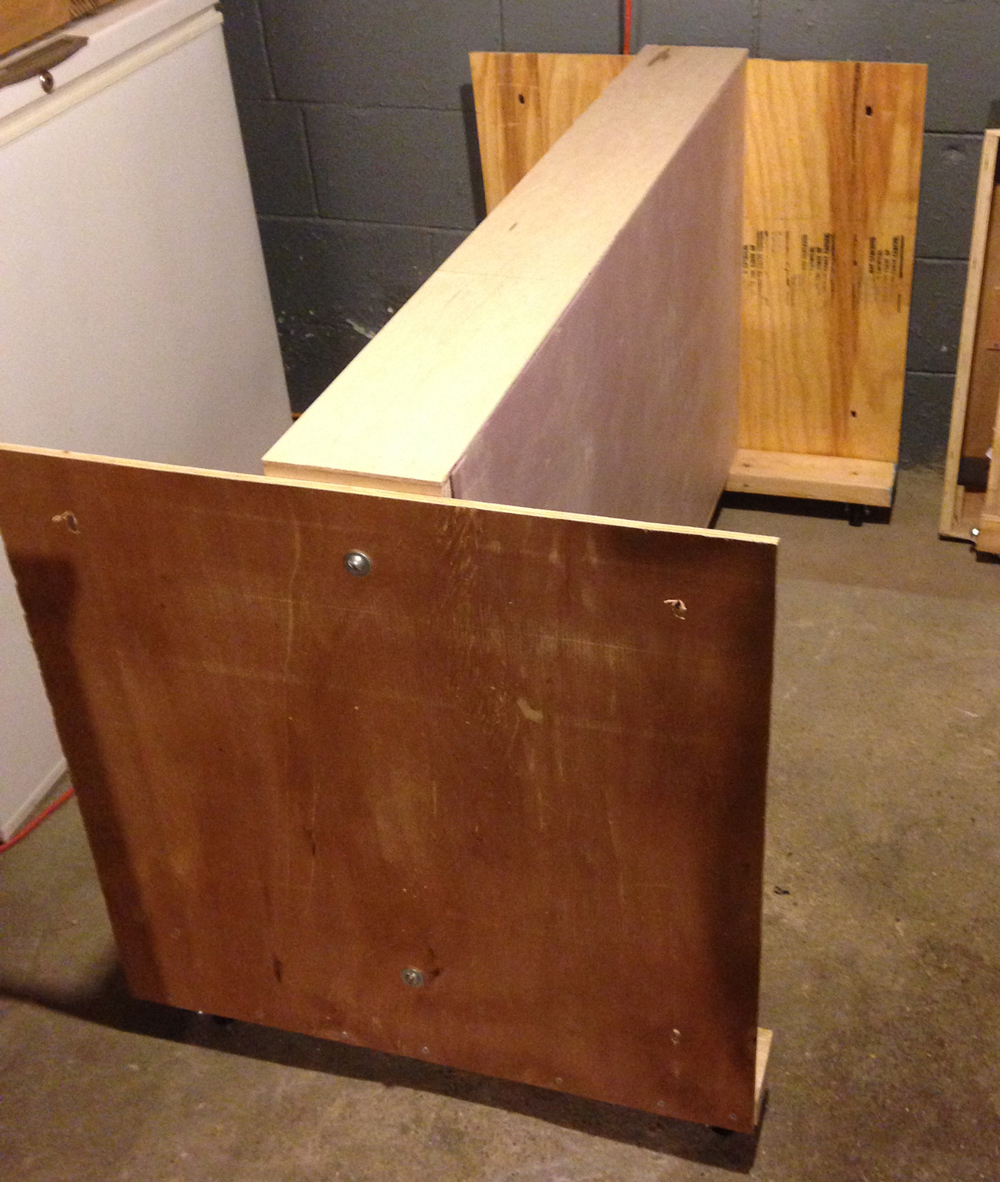
A word of warning when designing a rack for hauling modules. Do not just measure the dimensions in the vehicle, measure ALL doors, halls, corners and anything else along the path out of the house. Take all these measurements into consideration before you finalize your design (ask me how I know this).
Next month I will go step by step on the construction methods for assembling this design.
Marshall, how would I find the photos of the iron ore mines in Port Henry, NY. I know there are a number of old black-and-white photos that I was able to glean from the Port Henry Historical Society but cannot locate them in LOC. Help! Thanks!
Tom,
I do not know of any photos of iron ore mines in Port Henry, NY. If I was just searching in general, I would use “Port Henry NY” in the LOC search box and see if anything comes up.
By the way, I like your module design.
why use a plywood bottom, and not just the xps foam? It’s strong enough, and doesn’t seem to sag over time.
I used the plywood bottom for a few reasons. I planned on mounting a lot of hardware on the underside and rather than reinforcing every time, the plywood gave me a very nice stable surface for anything I might want to do. I feel the spacing of the frame was too large for the foam without flex and I also wanted to add extra lateral stability to the frame. Since the frame design does not have cross beams some lateral stability would be lost without the plywood.
Great info, Marshall. Thank you much!
Hi, the link to the sketch-up fee is bad. Is the file still availible?
Thank you for bringing this to my attention! The file can be downloaded from http://smallmr.com/wordpress/wp-content/uploads/2024/12/26_wdie_freemo_3.zip and I have updated the link in the article.