While planning the Peshekee River Railroad, I had some significant challenges to overcome. My home has limited space and my railroad would have to share my workshop. I do woodworking so the dust levels are high. The layout will need a way to be protected when doing my woodworking. The location for the railroad dictated that the layout would be above 55 inches and on a shelf to clear all my tools and equipment. With such a height, I also decided that the bench work should be modular so I could take sections down and work on them at the work bench. I also wanted integral lighting and backgrounds. The benchwork design evolved into a boxed frame design with an open front. When doing wood working, I would be able to drape a curtain on the front to limit exposure to dust.
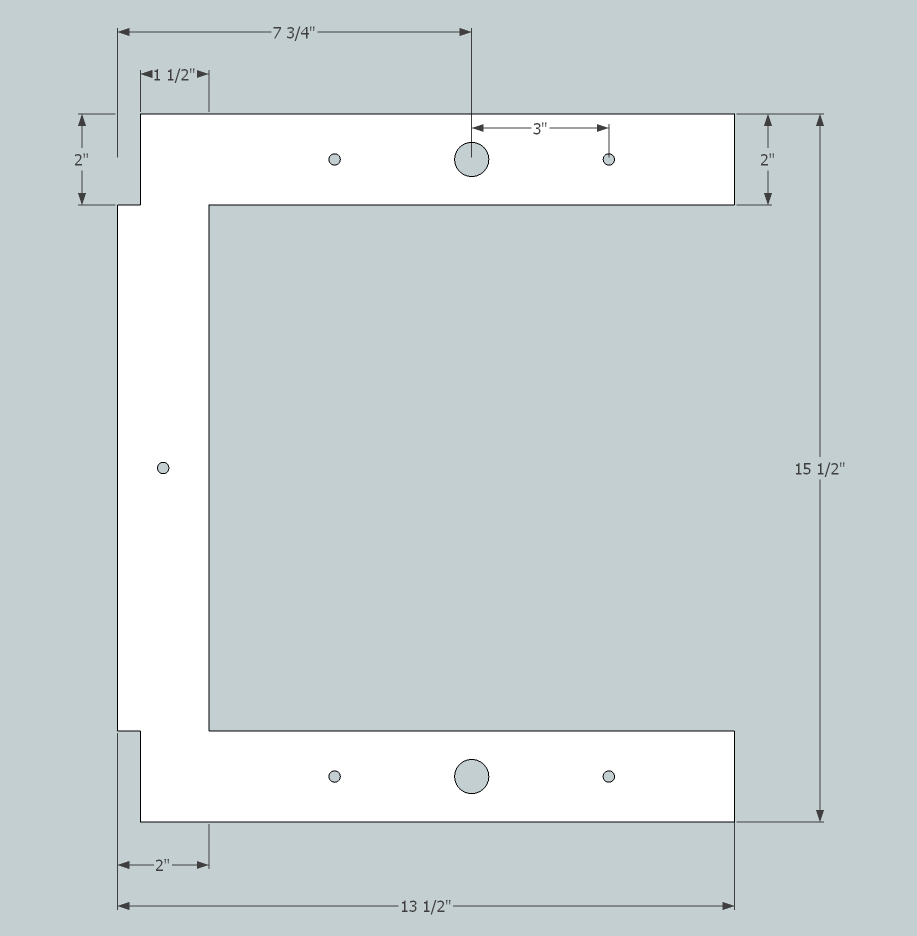
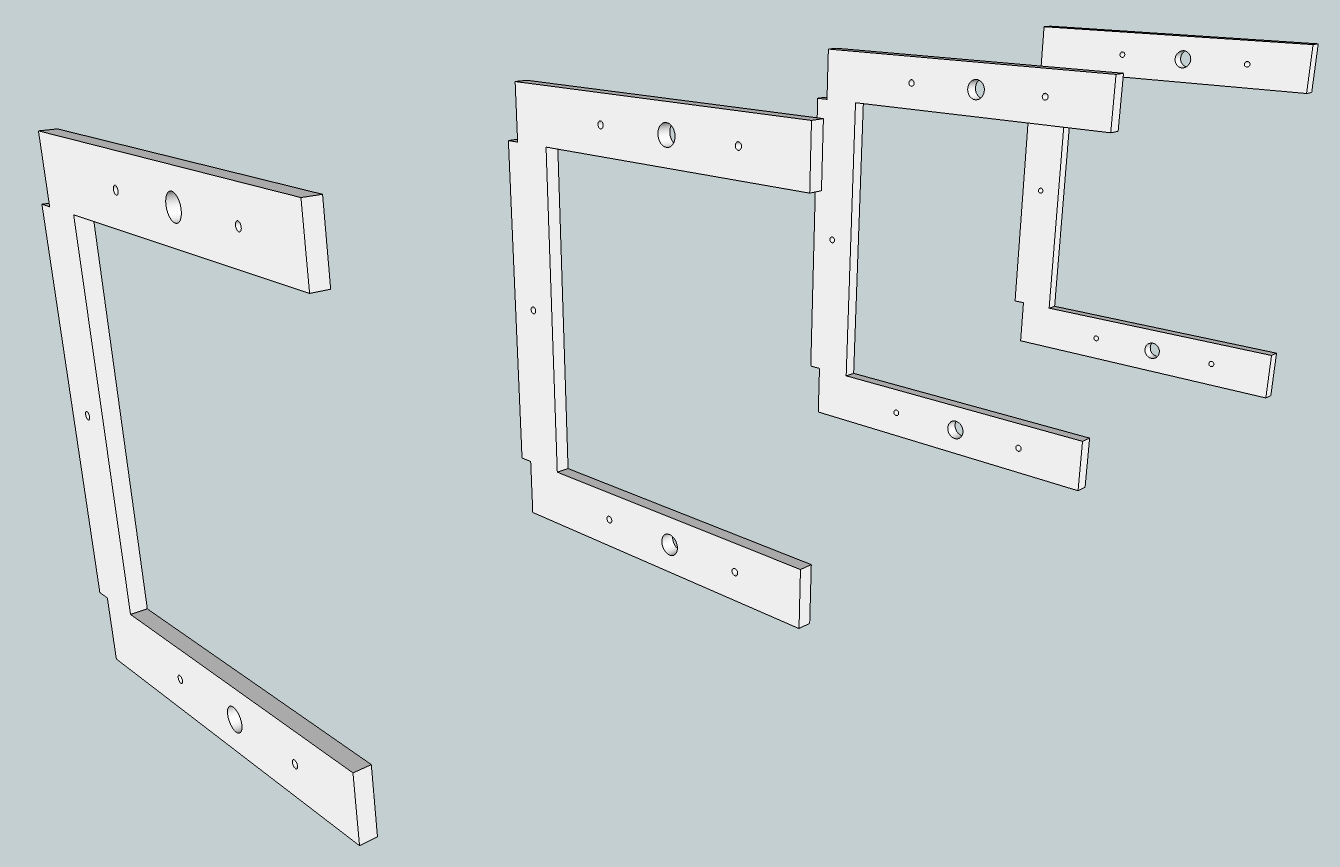
The design centers around 48 inch modules each with four “U” shaped 13.5 x 15.5 ribs 16 inches apart. I used 3/8 plywood but 1/2 inch could also be used. All dimensions are given using 1/2 inch plywood. Each rib is notched at each corner of the “U” to accept horizontal braces. 3/4 inch holes were drilled in the center of each leg of the “U”. These holes allow power leads to link to adjoining modules. Smaller 1/4 inch holes for alignment bolts are placed 3 inches from the larger holes. Another alignment hole is indicated at the bottom of the”U” (back of the module) but I have since found it unnecessary, as the others provide more than sufficient alignment and holding power.
These ribs are turned so that the open faces out, spaced 16 inches apart and connected together with 48″ x 2″ strips of plywood on the back and front. I use finish nails to hold everything while the glue sets.

Front braces (48″ x 2″) are also added to the front.
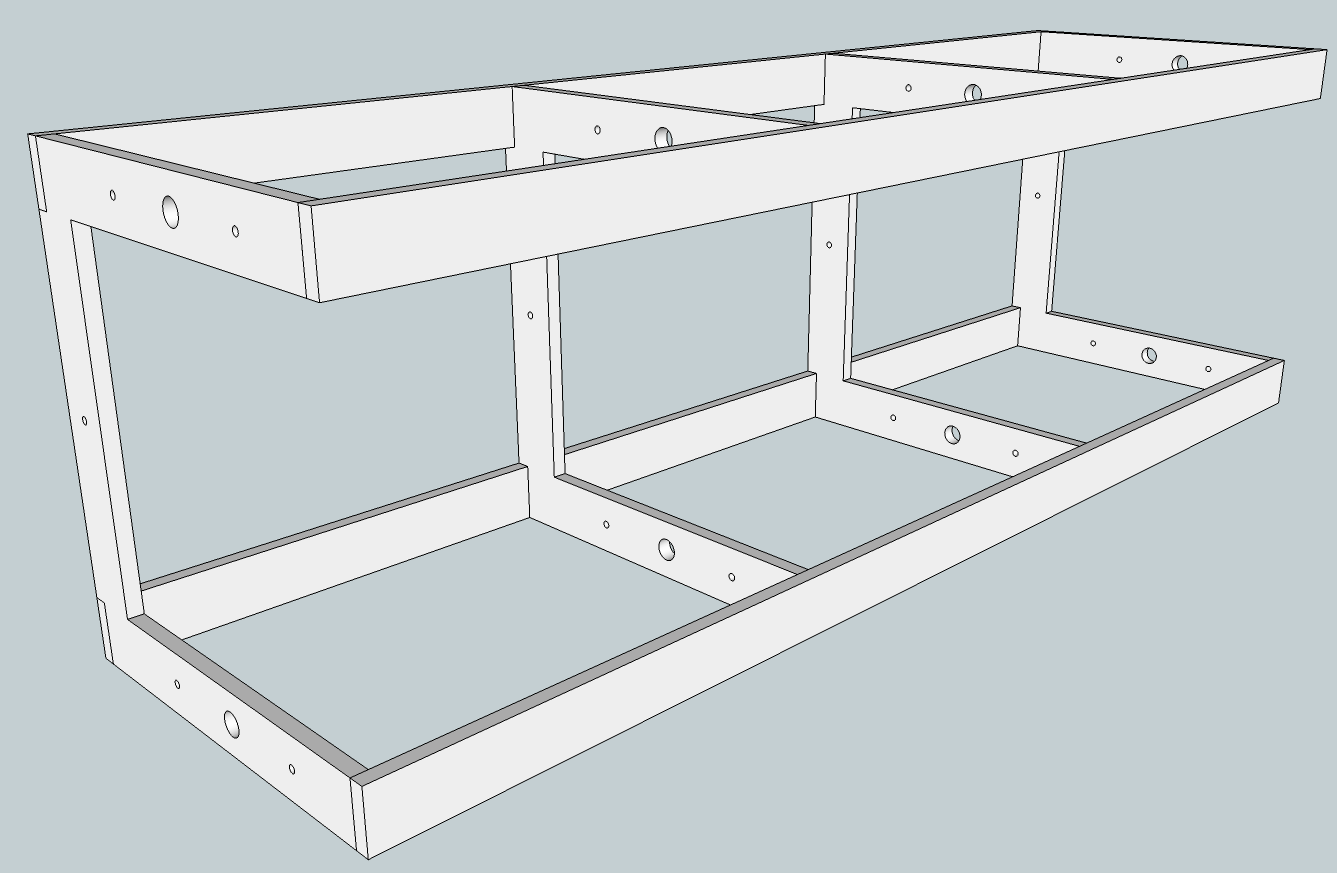
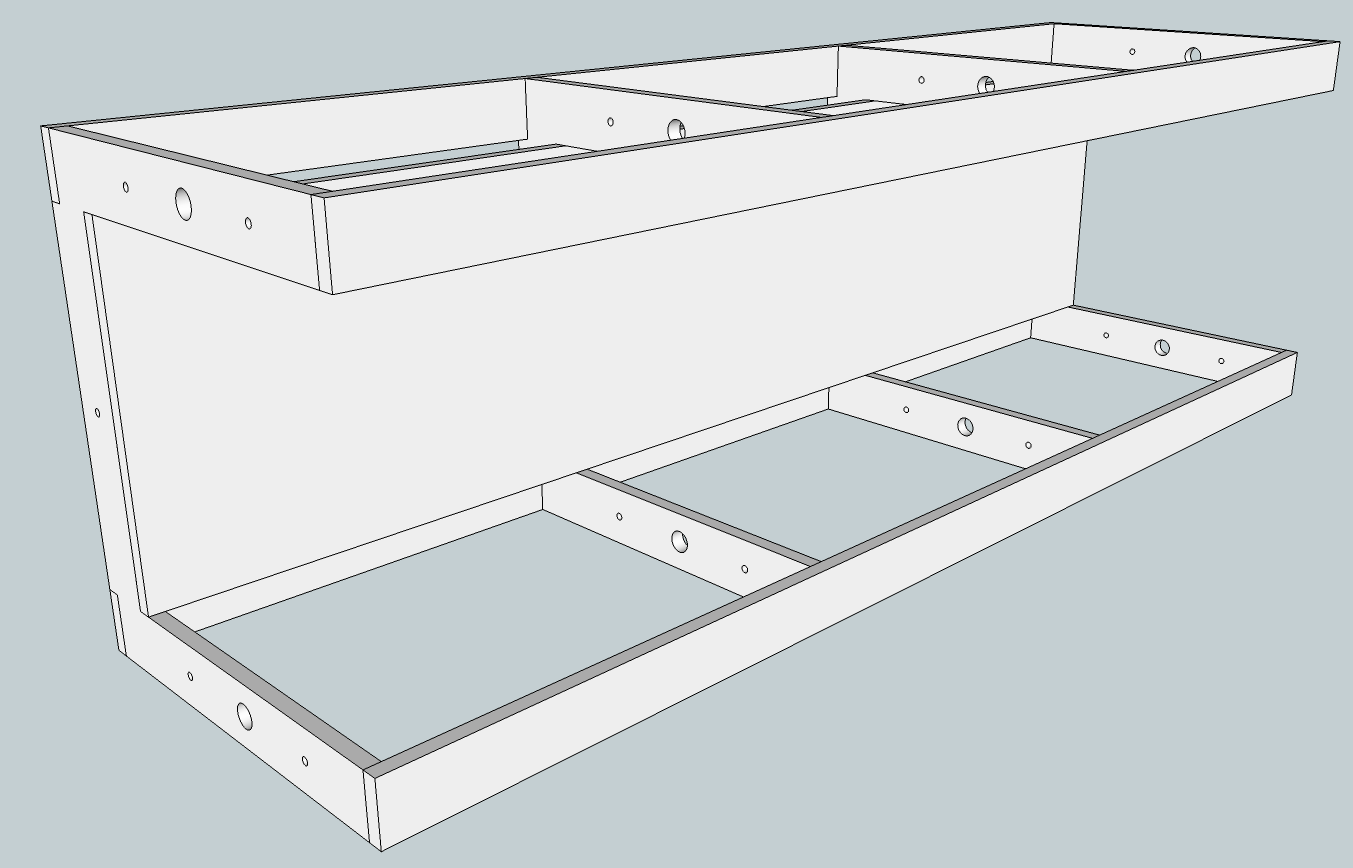
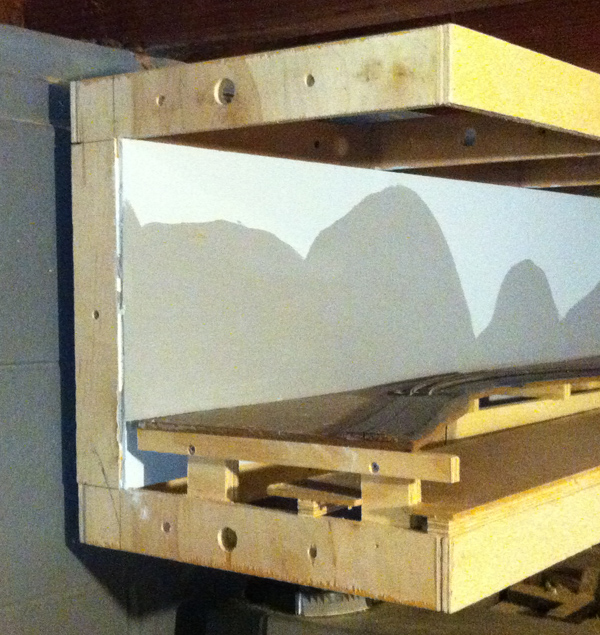
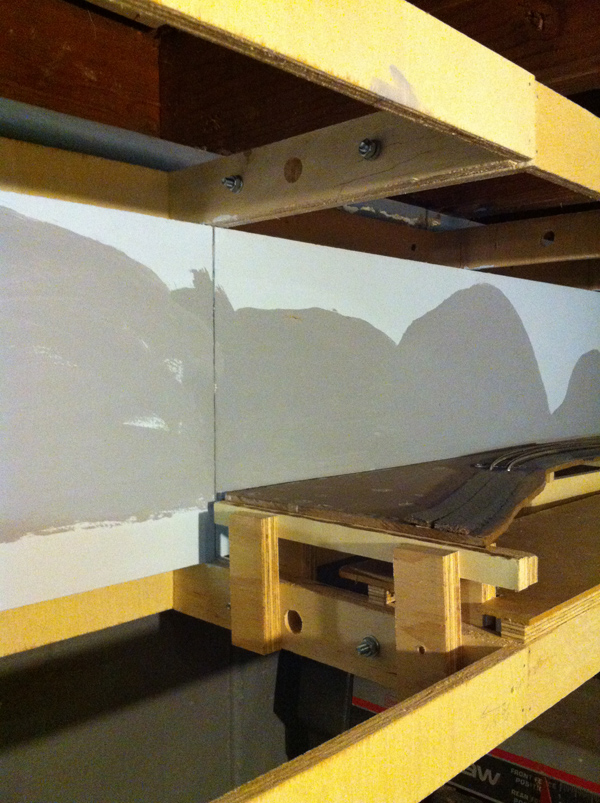
A rear panel is added. This rear panel becomes the base for the backdrop.
Once the module reaches this level of construction it may be mounted to the wall. to keep the mount simple I used a “French Cleat”. A french cleat is a length of 3/4 plywood cut lengthwise at a 45 degree angle. One half is attached to the upper rear brace and the other is attached to the wall. When the cleat on the module is placed on the wall cleat they lock together.
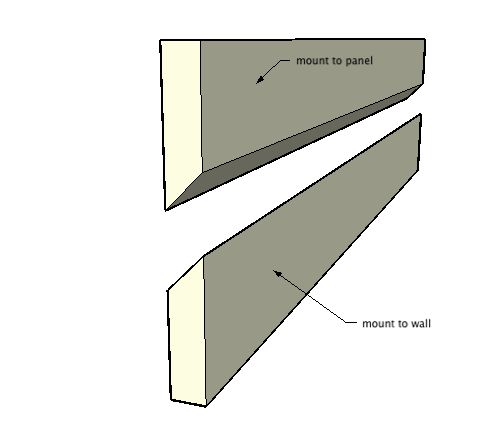
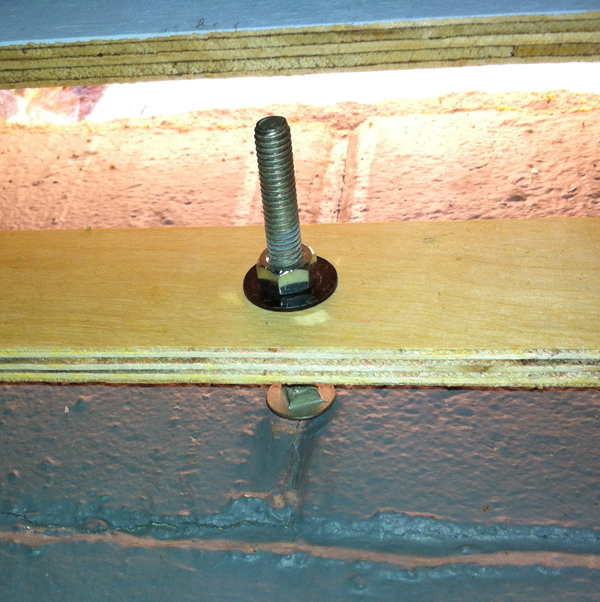
Another small piece of 3/4 inch plywood will be required on the lower brace to maintain the 3/4 inch distance and keep the module level. If your wall is very uneven (like mine), a bolt/nut combination could be used. This allows for very small adjustments to make sure the layout is level.
Sub-roadbed is added by using risers as is typical in L-girder benchwork.
At this time I have all the modules assembled and mounted to the walls. Most of the track is in place as well. I originally intended to use CFL lighting but will be using LED strip instead. More updates will be forthcoming.
Nice concept, clear article and photos – good job! I wonder what the weight of a 4′ module is, with tracks and backdrop? Hard to lift on and off the wall?
Keo
Very glad you liked the article. As you can see from the photos, I took one unit off the wall to take the photos. With just the frame, sub-roadbed and track the unit weighs less 10 lbs or less. The frame is very light and as long as you use lightweight materials for the scenery the module can remain light.
Hi Marshall,
We met and worked together on the Free-mo layout at the NTS in Grand Rapids. I’ve been following your work on the web off and on. It’s great stuff!
Your drawings of the frame are excellent. What CAD program do you use for this?
Best regards,
Stuart
Hi Stuart,
I used the free software SketchUp from Google. It is very easy to use and as you can see provides good results.
Hello Marshall I enjoyed reading your take on your shelf based benchwork. I have a design very similar to yours I have been working on for a few years now. I’ve only recently documented it here http://www.therailwire.net/forum/index.php?topic=30022.msg329227#msg329227 and on my blog http://nscalerail.com/howto/c-benchwork-t-trak-module-build
I call it “C” based benchwork for obvious reasons. It’s based off the module work of Kiernan Ryan (sp) and other in Australian model RR’s (Prof Klyzir). I’ve applied the same principles to ttrak as well (you can see it in the Flickr set linked below).
I will say for the cleats you will gain more rigidity if you use a full horizontal board to make up the cleats and don’t notch it in the back. This makes the cleats a little more rigid and reduces some sag. I had mine hanging on the wall about 3 years and really the only issues I had was the cleat pulling away from the wall (I should have used more screws). But with the illustration in the Flickr set (not notched version) the only concern is making sure all cleat thicknesses are the same depth (with plywood you’re safe sounds like.)
This flickr set is a pretty good representation of what I have. http://www.flickr.com/photos/nscalerail/sets/72157634574668227/ I’m currently reconfiguring them to build the Jay Street Connecting railroad. I also have designs for inner and outer coved corners and plans for how to extend the design into the room with minimal legwork if you’d like to see those. Keep up the good work.
Yes, yours a little different design. Mine had to be anchored to a block wall so I used concrete anchors. They will not pull out! On drywall you would have to find the studs and screw into those with at least 2″ screws.
Mine has been hanging in my basement for about four years. I preferred keeping the frame separate from the mounting board. The lip formed by the upper structure made attaching the cleat easy. Since 3/4 plywood is more expensive and heavy I feel i saved some weight and expense by using shorter cleats. Stability is good when several are connected together. A shorter layout like yours would be better served with the longer cleats.
Your design and final product look very good! It creates a very clean look, like a piece of furniture.
Agreed the furniture aspect is what I like about it too. To have everything float on the wall is a nice additional effect.